Hello World! Can Can Dancer has moved. Please visit www.cancandancer.com to see new DIY posts (and all past posts too!). Happy Crafting!

Clay + Twine Bracelets

Hello World,

Have you ever worked with Super Sculpey? A professor back in college introduced me to it because unlike regular oven-bake clay, it cooks into a ceramic-like material (that is pretty much shatter-proof). It actually feels more like plastic once cooked, and it slightly bendable.

I had decent amount leftover from art projects, and decided to whip up some bracelets with my own custom charms.


Check out below for how to make some yourself. Warning: this tutorial is longer than usual. :)


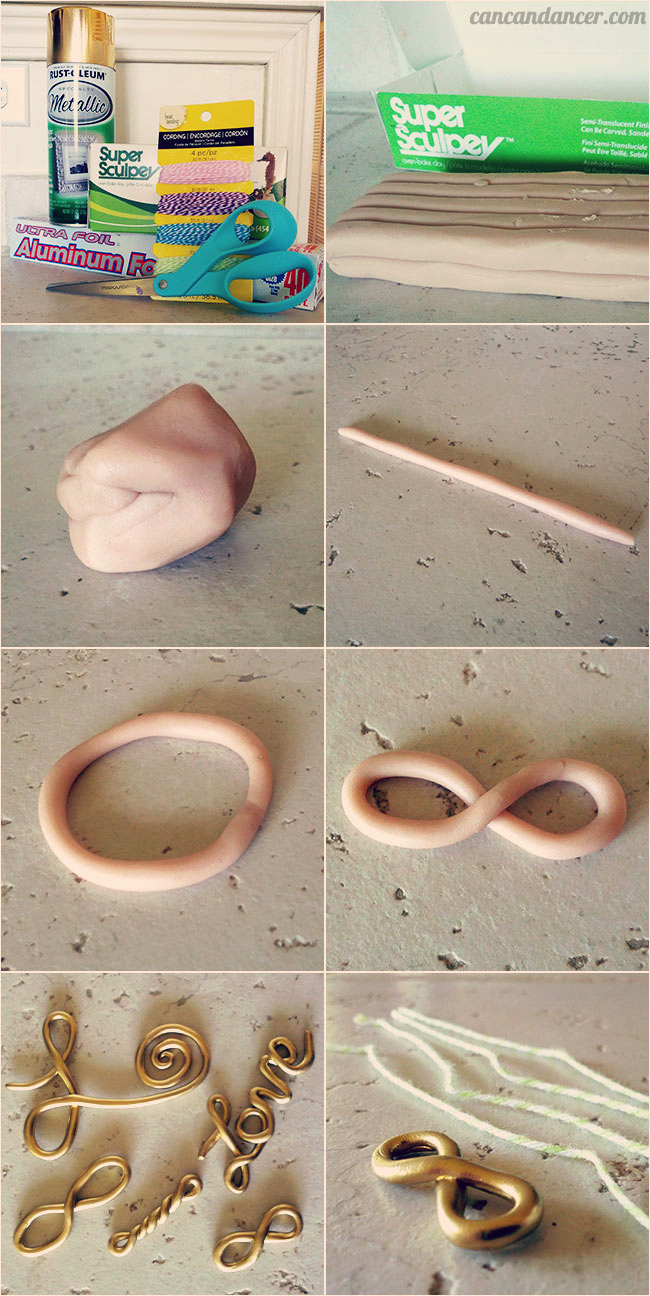
1. Gather your supplies: oven-bake clay (and a standard kitchen oven), aluminum foil to cook it on,  twine (mine is baker's twine), scissors, spray paint, and beads along with a short piece of jewelry wire (not pictured).

2. Break off a quarter-sized amount of clay.

3. Play with the clay until it is more pliable. 

4. Roll your clay into a nice, even log.

5. Connect the two ends of your log together, and then roll the connected area between your fingers until the seam blends away.

6. Holding your loop, twist it until you form an infinity symbol.

7.  Bake your clay according to your box directions, allow to cool, and then paint.

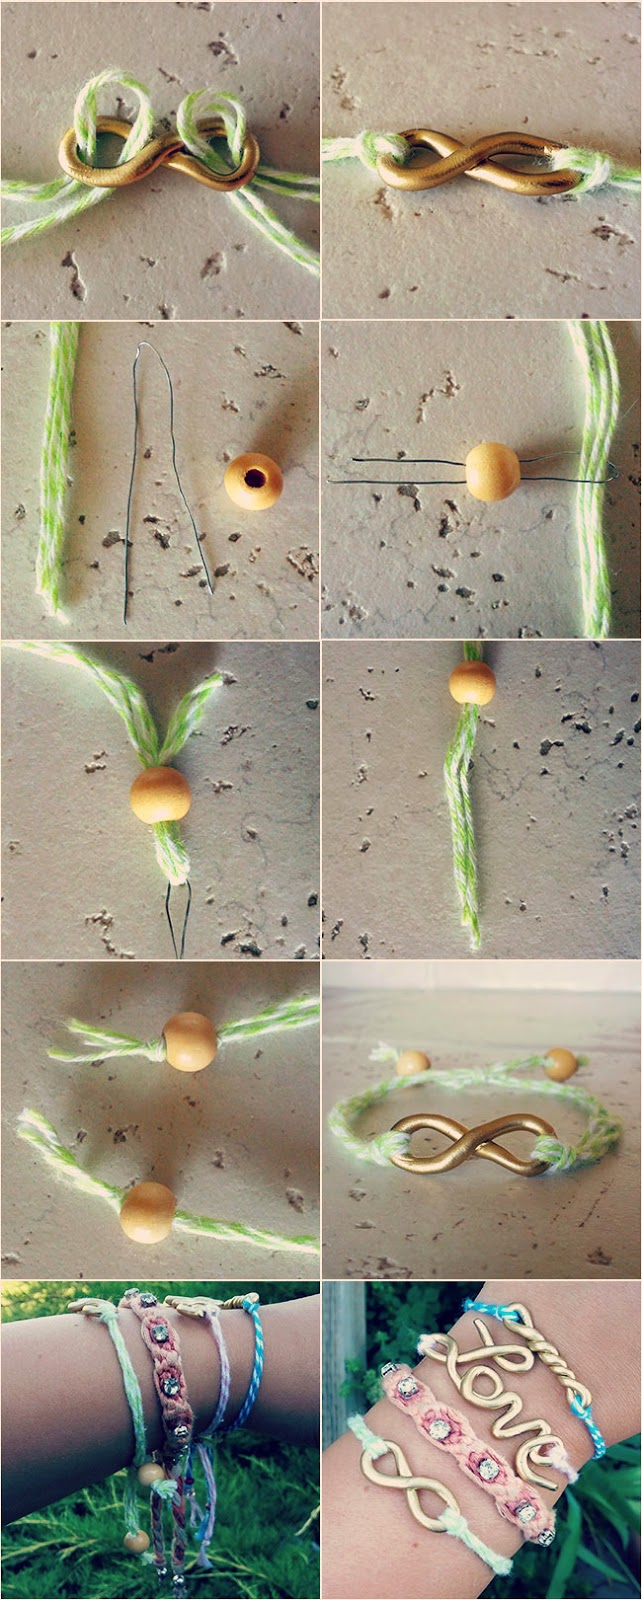
8.  Cut out 2-4 pieces of twine, all the same length. If you are unsure of the length, cut each piece equal to the circumference of your wrist. If it ends up being too long, you can always trim it later.

9.  For this bracelet, I used four pieces of twine. I paired two for each side. Fold them in half and feed the looped end through your infinity charm.

10.  Pull the corresponding tail ends through the thread loops, trapping the infinity charm.

11.  Now, if your twine is too difficult to feed through a bead, use this trick: get your jewelry wire, and fold it gently in half.

12.  Loop the wire around a tail end of your twine, and feed the bead onto the wire.

13.  Pull the wire through the bead.

14.  Pull until the tail end of your twine is through the bead.

15.  Tie double knots at the end of each twine to secure your beads.

16.  To wear your new bracelet, either tie a simple knot around your wrist, or do a sliding knot. I used this tutorial to do my knots: YouTube.


Experiment with different shapes, colors, ect, and enjoy your new arm candy!

Happy Crafting!

Makeup Brush Cleaner

Hello World,

If you use makeup brushes like me, cleaning them is a necessity. But cleaning them regularly can be time-consuming. That is, until I came across a simple, but genius DIY via SecretLifeOfABioNerd. All you need is a plastic clipboard and a hot glue gun with glue sticks.

Check out her tutorial on YouTube.


Pretty simple huh? Cleans them so much faster compared to washing them in the palm of your hand.

I also made my own makeup brush holder from an empty candle jar. Check the tutorial out here.

Happy Crafting!

Make your own Seashell Garland

Hello World,

I have been on an ocean kick lately: from accessories, to the bottles of wine I buy, to home decor. I have found it difficult to find beach-inspired home decor though that isn't too 'loud.'

With that being said, I decided to make some simple seashell garland. I currently don't have any power tools, so I used a wrapping method to make my garland (instead of drilling holes into each shell.)


Check out below for the instructions:


1.  Gather your supplies: seashells (I found a nice, big bag at a thrift shop for $2), twine (mine is hemp) and scissors.

2.  Pick your first sea shell. I picked ones for this project that had a nice 'bulge' on the top. (So my twine wouldn't slide off.)

3.  Lay your seashell on top of your twine, with your tail end above it. (I didn't cut my twine until I was done with my garland.)

4.  Wrap your twine around your shell, and loop it around the back, making an upside down 'V' in the back.

5.  Continue wrapping your twine around the front, making an uneven 'X.'

6.  With both ends of your twine at the top, pull it tightly around the shell. Tie a knot, trapping the back 'V' in the knot.

7.  If your twine ends are aiming in wonky directions, simply feed the twine under your knot to force it to lay more flat.

8. Continue with the rest of your shells. I left 3-4 inches of twine between each shell.

Happy Crafting!

Twine-wrapped Photo Display

Hello World!

With my new internship, I have my own work area. It was looking rather bland (with just standard office supplies), so I decided to make my own photo display.

I made a symmetrical-style display in the past, but it was tough to get all the ribbon angles exactly the same. This time around, I decided to make one that didn't need to be perfect and was more sporadic in the wrapping. I chose neutral fabric and twine so my desk doesn't scream GIRL.


Check out below for the instructions:


1.  Gather your supplies: foam core, fabric, twine, scissors, and hot glue with sticks.

2.  Place your fabric (right side down) on your workspace, and place your foam core on top of it.

3.  Begin by placing a string of hot glue on your foam core. 

4.  Wrap your fabric around your foam core and stick to the hot glue. (If you are worried about burning yourself, push the fabric into the glue with a pencil or chopstick.) Continue glueing and pressing your fabric until it is completely adhered. 

5.  Place a pile of hot glue on the back side of your foam core, and place the tail end of your twine into it.

6.  Sandwich your twine and hot glue with a piece of scrap fabric. (This will help to better secure it, once the glue dries.)

7.  Begin wrapping your twine tightly around your foam core. Go in random directions, or form a pattern if you wish. 

8.  Once you feel you have enough twine wrapped, repeat step 5 with the other tail end.

9. Allow everything to completely cool. Glue fabric to the back if you want to hide the sloppy backside.

10. Slide photos, cards, ect between your strings, and enjoy!


Happy crafting!