I finally tried freezer paper stenciling! It took me a while to actually find it in my town, but I finally found some, and it was about $6 a roll at Walmart.
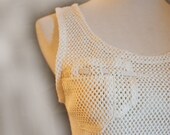
It's actually really easy to do too! This was really cheap for me because I nabbed this tank top at a thrift store for a whole $0.50.

Here is how you do it:
1. Cut your freezer paper to your desired size. Now either draw or print on the paper side, not the waxy side. (Only with an ink jet printer! If you use a laser printer the freezer paper will bind with your printer and ruin it! I have a laser printer, so I went back to my elementary school skills and freehanded/traced an image with the use of a window.)
2. Next place a piece of cardboard in between the front and back of your shirt. (This way the paint doesn't seep through.)
3. Iron the freezer paper, waxy side down on your shirt. Make sure that all edges and small detail points are nice and stuck on.
4. Paint onto your shirt with a sponge-like applicator brush. (I mixed acrylic paint with Monotype base, which I had leftover from a printmaking class... I'm not exactly sure if it will last, but the bottle does say it is permanent. (Fabric paint or textile ink might be safer.))
5. Do as many layers of paint until you are satisfied with the color payoff.
6. Allow your paint to completely dry. I was impatient and took a blowdryer to it.
7. Gently peel off your freezer paper, it should come off very easily.
8. Iron your shirt to set the paint. Place a layer of plain cotton fabric between your shirt and the iron if you are worried about it sticking to your iron. Then allow to cool and enjoy!