Hello World! Can Can Dancer has moved. Please visit www.cancandancer.com to see new DIY posts (and all past posts too!). Happy Crafting!

Bottles to Vases

I love to recycle and repurpose materials.  I can't part with Skyy vodka bottles because I just love the blue color so much. I made 2 different vases.  Now I just need to get some flowers or twigs to put in them.


1.  Remove all labels from your bottles.  I found it easiest to load a scrubbie up with soap and have at it.

2.  Apply contact paper in any design up want.  Make sure you run your finger over it to remove air bubbles.

3.  Spray paint over it evenly.  I did 2 coats.

4.  Remove contact paper gently.  I tried at many angles, but still had some minor, messy edges.  


1.  Remove all labels from your bottles.  I found it easiest to load a scrubbie up with soap and have at it.

2.  Use puffy paint to make your designs.  I tried to do floral design at first, but it ran down my bottle. (Maybe it's because I used fabric puffy paint)

3.  Spray paint over it evenly.  I did 2 coats.


Thrift Store Item Makeover

I recently donated a few bags of unwanted belongings to a thrift store, and while I was there I found this napkin holder for 50 cents.  It didn't look too hot, but I knew it had potential.  It was originally red and yellow.  I repainted it neon pink and lime green.


I first painted the entire holder white.  I didn't bother with sanding.... Then I painted it with the neon paint from Michael's.  The paint was only $0.33 a bottle. The pink paint was so thin, it took 4 coats. I then painted all my details. I had to mix my greens from my stash to get a color I wanted.

It might actually be a mail holder, I'm not sure. But it gets the job done.  

Zipper Flowers

School started up again, but luckily I had some free time to make some more zipper flowers.  I was really into the muted and earthy tones the day I made them.  They all have a beachy feel.  Maybe its because I want winter to be over. lol

I even named some of them after oceans.  I would love to live near the ocean.  Last spring, I went to the Oregon coast for my spring break.  The smell, sound, and wild life are all beautiful.

Zipper Flower Hair Piece- Natural

Zipper Flower Hair Piece- Pacific

Zipper Flower Hair Piece- Atlantic


Valentine Decorations

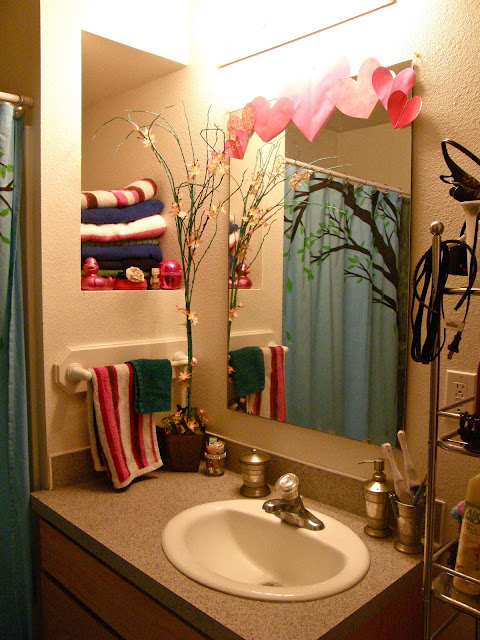
I always decorate for holidays really early.  I decorated for Halloween in September, I decorated for Christmas the day after Halloween.  Now, I decorated for Valentine's Day on New Year's.

I love Valentine's Day.  Not because its supposed to be a romantic holiday, but because I love the colors and how cutesy the decorations can be.  It also is the month I was born in, so it reminds me of when I was younger and would have pink, princess birthday parties.

I cut out paper hearts from scrapbook paper, and bought a 50 yard roll of red, sparkle ribbon from Michael's for $7!  It was from their custom floral department after Christmas. I really want to buy a paper heart punch and make my own magazine garland to hang everywhere. (Thanks to Pinterest for inspiration. :) )


I bought this fabric in high school, and made skirts for me and my friends with it.  5 years later it was just waiting to be used.

I tried to make my own pom-poms.  They take so much yarn!


I bought these sparkle branches at Micheal's for $1 each after Christmas. They don't scream Valentine's Day, but I love the teal color.

I shoved them in a dollar store flower pot, filled it with rocks from my property, and pulled apart a dollar store fake plant and twisted it around the stems.  Super easy!

Book Mobiles

2 years ago, I took an art class where our project was to make altered book art.  One of my friends actually introduced me to these. We would sit and fold book pages for what seemed like hours.  She even made a book mobile with a World Book.  It was sooooo heavy!

I have 3 hanging in my bedroom.  They are really easy and free/cheap to make.  Where I live, we have a recycling center that has a book bin.  We would rummage through the bin to find book sizes that were suitable.

Your hands will get very dirty in the process, from all the ink.


1.  To start the project, first tear the covers off of your books.  (Using a paperback makes it much easier.) Begin by folding one of your pages in half. Fold the next two pages in half as well.

2.  Everything in the mobiles is done in groups of threes.  This way there is nice volume.  Fold the next three pages individually at any angle you want.

3.  Fold three pages individually in half again.

4.   Fold the next three pages individually at any angle you want. (It could be the opposite, so that the mobile is symmetrical, or fold the pages ends toward the middle to make a lantern shape.

5.  Continue alternating until you have folded the entire book, or until the book has curled up on itself.

6.  The pages will be so tight that the mobile will form itself.  Next, use a long piece of ribbon, tie a knot, and feed the ribbon through the center of the book mobile.  Hot glue the knot at the base to secure it.

7.  Cut out two pieces of scrapbook paper in large circles.  Glue one on the bottom to hide the ribbon knot.

8.  Poke or punch a hole in the second circle of paper, feed the ribbon through it, and hot glue it to the top of the mobile.

9.  Because these mobiles are so light weight and bonded with hot glue, the ribbon should not pull through.

10.  Now you have a recycled piece of art. Hang and enjoy!

I just noticed that this one was glued upside down. lol

Jewelry

I remember when I was younger and I would sneak into my mom's room and look at all her pretty vintage jewelry on her dresser.  I would look at her pieces and then carefully put them back where they belonged. I couldn't wait until I was older and had my own.

Now that I'm older, I've created a collection of my own.  It has evolved over the years.  In junior high, I loved wearing big, bold beads and stuff that looked like candy.  Everything was as bright as Lisa Frank gear.  Now my collection is a little more refined, and making your own jewelry makes it even more fun.

A lot of my jewelry I wear the most I actually made.  I love finding charms in clearance bins or in thrift stores and making new jewelry with them.  I don't have any expensive jewelry because I feel it is a waste of money.  Why would I wear diamond earrings, when I would where fake ones that cost me only a few bucks?

Here's a peek at some of my stash.  I have another jewelry holder on my nightstand with rings and bigger earrings.


I made this jewelry holder.  It was super easy.  Just hot glue or staple lace inside a frame.  I made this one 3 years ago, and it's still holding up nice.


My birdcage is from Michael's, with a vintage Avon owl inside it.


I love owls. :)

After Christmas the gift sets are so cheap, and Victoria's Secret has their Semi Annual Sale, so I stock up on more perfume.  My favorites are sweet or food-like smells.

Satin Flowers

While on Pinterest for my winter break, I found a really simple tutorial for how to make satin flowers.  It is here.  I found that using really cheap satin (from an old pillow case) melts really fast and destroys the flower.

The best fabric to work with for me was satin brocade.  (Both the blue/pink and black/purple are this type of fabric.) It melted at a slower rate, and the edges look cleaner.

I tried some really stiff white satin from an old 80's wedding dress, and it burned so quickly.


This one was my favorite. I made it a headband out of some leftover jersey for it and gave it to a friend for her birthday. 


I also tried a plain pink satin that I bought a few years ago.  It didn't melt but more of curl and warp.  It ended up more rose-like because of this.


Fish Scales Skirt (made from old t shirts)

Yesterday, I  made a t shirt quilt, and I had a ton of scraps.  Scraps that were huge and itty bitty.  I was originally going to make a plain skirt, but after staring at it, I decided to try make it have a fish scale texture.


1.  Lay out an old t shirt (I had the bottom half as a scrap) and trace a skirt that already fits you. Cut.

2.  To make a foldover waistband (like on yoga pants) cut one long strip that is twice as tall as what you want the finished waistband to be. Sew up the short sides to make one giant loop.

3.  Turn the raw edges of the waistband to the inside as you fold it in half.  Also, sew the two side seams of the skirt body together.

4.  Place right sides together.  As in, flip the band over so that its raw edges match the skirt body's raw edges.  When you sew them together, you will sewing through 3 layers of fabric.

5.  All raw edges should be on the inside, stitch them down, and now you can foldover the waist band.

6.  Cut out your first fish scale.  Mine is 4 inches wide, and 3 inches tall.

7.  With tailors chalk, mark where you want your layers to overlap.  I did mine every 1.5 inches, except the bottom.

8.  Cut out a ton of scales.  I did 12 for each row (all the way around the skirt) for 7 rows.  I cut out 84 scales.

9.  Make sure you have your machine set to a stretch/knit setting.  (I didn't use a normal zig zag because it warps my fabric like crazy.)

10.  Sew your scales onto the body of the skirt, following the lines you drew.  I overlapped my scales half an inch while sewing them onto the skirt.  Also make sure you alternate your rows- this way they won't line up perfectly.  

Jersey Necklaces

With my Pinterest addiction, I came across a super easy tutorial by V and Co.  I followed her tutorial here.   I found it really helpful to watch her video to get the loops right.  She originally made bracelets, and I just kept on finger-weaving until it reached a necklace length.

I did the 2 finger weaving method.  I tried the other ones, but the 2 finger was my fav due to the width. I love how it looks like a braid, but it has more dimension, sorta cube-like. (I don't know how else to describe it. lol)

I used a grey stretchy sweater/knit from a thrift store, and leftover blue tie-dye jersey.


I made the grey one first, and then figured out how to hide lose ends in the blue one. lol

Happy New Year!

Happy New Year!!! I remember when I was in elementary school, my classmates and I talked about how writing the date 01/01/01, 02/02/02... 12/12/12 was pretty awesome!  And now we are in that final year!

For my New Year's Resolution, I want to craft more.  I always get super busy with school and I forget to do all the DIY projects I had in my head or that I find online.  Pinterest is soo addicting!  My Pinterest is here.

I decided to do some interesting hair for New Year's Eve this year.  I got the idea from Crochet Clouds.  I used the same technique to do my hair.  I only had green pipe-cleaners sitting around in my stash though.


I was really in the Valentine's day mood, so I hung up my decorations early and also did my makeup with little hearts too.