Hello World! Can Can Dancer has moved. Please visit www.cancandancer.com to see new DIY posts (and all past posts too!). Happy Crafting!

DIY Custom Cabinets (saved $5000!)

Hello World,

My parents recently installed custom cabinets in our dining room.  The original estimate from Home Depot for the cabinets and trim was around $7,000 (not including the countertop and hardware).

They wanted the cabinets in the dining room to match the kitchen, but our kitchen Thomasville cabinets were discontinued. So, my parents DIY-ed and made their own cabinets/counter for $2,000, saving themselves $5,000!

Check out below for pictures (thanks to my Mom):
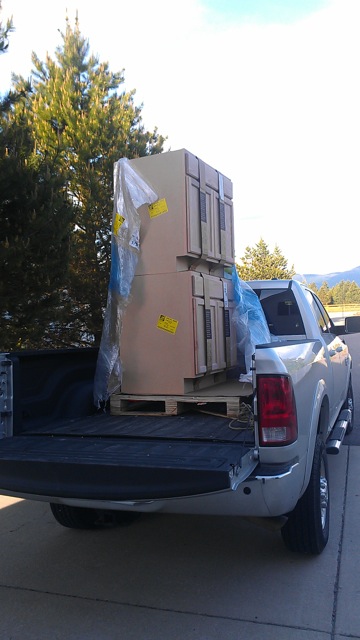
My parents ordered and picked up standard, unfinished, oak cabinets from Home Depot.

Here is a closer look at the plain cabinets.

Previously, there was a china cabinet in the dining room. (But they needed more storage- that thing was packed previous to this picture.)

Here are the plain cabinets installed thanks to my Italian father.

My dad bought a long butcher-block countertop, which he sanded and stained. (My dad mixed black acrylic paint and stain together to get this color because the stain alone wan't dark enough.)

My mom carved everyone's names in the countertop. 

My mom used a primer on the outside surfaces of all the cabinets.
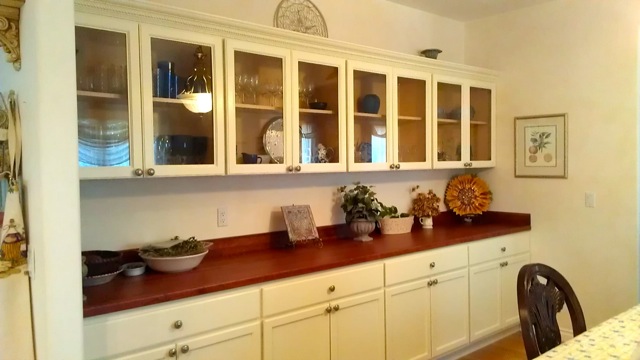
My mom sanded, primed, and painted all the doors of the cabinets.  She painted the doors and trim a light cream color to match our current kitchen cabinets.

Then my dad installed the finished countertop. My dad also installed the glass panels.  He bought glass for $8 a door (compared to $120 per cabinet door through Home Depot), cut out the wooden faces of the doors with a router saw and popped the glass in place.

My mom then painted all the edges of the cabinets with a mushroom brown paint. She rubbed the paint in random areas with a sponge to make them look more vintage. 
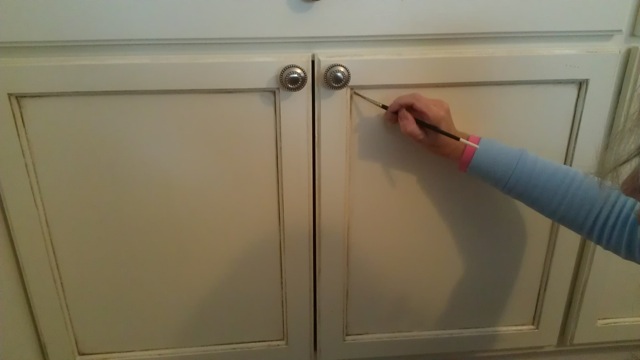
She painted in all the crevices with a tiny paint brush.

My mom also aged the cabinets to make them match the kitchen. She used forks and screws, and lightly hammered them into the wood surface.  Next, she rubbed brown paint into the dents and wiped off the excess with a damp cloth.

She also found the knobs at Lowe's for $3.00 each.

They added braided trim and crown molding to the top of the cabinets to match the kitchen,
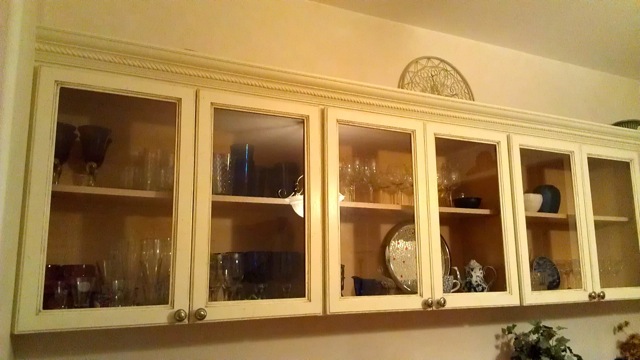
Plenty of visible storage!

And here is a picture of or kitchen island with the old cabinets.  Pretty decent match huh?


JoAnn's Remnant Bin Fabric to Pillows!

I recently went to JoAnn's and actually found great fabric in their remnant bin. For those of you that aren't familiar, on the ends of each quilting fabric aisle, or hiding in the back of the store, there usually is a four/five level bin, full of leftover fabric.  When someone buys fabric off of a bolt, there sometimes is leftover fabric that isn't enough to make a full outfit/blanket/ect.  The fabric is then rolled up, taped into a roll shape and marked as 50% off. Usually there is plain cotton or reject fabrics in the bin at my local JoAnn's, but this last time I found some gems.

I found some super soft leopard fabric, the pretty floral print below as well, along with tie-dye, damask print and some jersey.

I decided to make some pillows with some remnant fabric. The pillows on my couch needed a makeover. They were stained, lumpy and flat from being laid on so many times. 

I sort of followed this tutorial: Link, to make my pillow. I made my pillow smaller due to the fabric I had, and I did a double bow on the front. I now wish I had made a triple bow for more volume and to make the black bow more visible.

I used some of the filling from my old pillows, and also bough new filling with a 50% off coupon. (I usually find my coupons here: Link.)


I also made a plain pillow with two squares of fabric. I really loved the pattern and wanted a pillow I actually cold rest my head on. It is a little lumpy in this picture because I didn't let it flatten out properly by using it.


What have you made with remnant fabric or fabric scraps? 

Happy Crafting!


Braided Cinnamon Roll

I was only trying dinner items from Pinterest, and I finally tried a dessert recipe.  I made this Braided Cinnamon Wreath I found and it was pretty decent. I would recommend baking it less than it says because mine turned out a little too firm.


I heated up some leftover frosting in the fridge and then poured it on top of mine to really make it taste like a cinnamon roll.


Halloween- Last Year

Last year, one of my friends had the idea that we should go out on both Friday and Saturday of Halloween weekend- so we could wear two different costumes.  We decided on scary/sexy for the first night and cute/fun costumes the second night.

I DIY'd both of my costumes. I was a vampire the first night and a firefly the second night.


For my vampire costume, I made my cape with 2 yards of cheap velour from Joann's and some leftover black, glittery, stretchy fabric.  I was having a really hard time finding a cape that wasn't over $30 so I made mine for less than $10 (I used a coupon).  

For the body of my cape, I cut 2 huge circles - selvedge to selvedge of 60" fabric - each with one yard of the velour.  I cut a smaller circle in the middle of each circle for a neckline.  I measured the circumference of a tshirt I wear as a guide. With these two huge circles, I cut up the radius of each circle and sewed up one edge of each piece together. (This created one HUGE body piece that had a lot of volume. Using one circle would also work to create a cape.)

To make the huge collar I actually cut out the shape from some corrugated cardboard with the corrugation in the vertical direction. This way my collar would curve around my head, not over it.  I then cut out two pieces of fabric the same shape of my cardboard cutout with an additional inch of seam allowance added to each side.  I sewed the top and side seams together creating a pocket shape and then sewed this to the body of my cape.

To sew the collar to the cape was quite the task, since I had cardboard in the collar.  I did not sew through the cardboard at all. I sewed the final seam very close to it, trapping it inside the collar cover and attaching it to the center back of my cape's inner circle.

I sewed the black glitter fabric around every free edge in a bias-tape manner. I also attached two long strips of fabric in the front of my cape so I could tie it closed, but my collar was so heavy it fell backward with a simple bow.  By criss-crossing the ties under my bust and knotting in the back, there was enough tension to hold the collar cape up.

I wore a corset that was on clearance at Hot Topic in March, black lace tights, and a glitter tube top actually as a skirt. The necklace I have had since I was 18, and I can't remember where I bought it.

I bought my wig from Joann's on clearance and it originally was wavy.  I draped it over a bucket and poured boiling water over it in my shower to straighten it. I let it air dry and then gave it a little trim.

The cape was my favorite part and it kept me warm even in the chilly Idaho Halloweens.


For my second costume, I really wanted a costume that lit up.  I instantly thought of a firefly. Making the abdomen for my firefly costume was a... learning process. 

I basically made an open ended pillow that tapered to a small circle end.  I cut out long strips of fabrics and trimmed the sides so they were each a trapezoid. I sewed these trapezoids together and end up with one elongated trapezoid with a ton of seams.  I sewed the final angled sides together and sewed a small circle of fabric to the tip end to create a 3D shape.

I then created shorts and sewed the huge abdomen to the butt of the shorts.  I then cut the 'crack' of my shorts open and shoved polyester batting into the firefly abdomen making it full in shape. Because I cut the 'crack' seam of my shorts open, I was able to push lights into the firefly bottom.

I used two tap lights from the Dollar Store, but I think glow sticks would have been better and more reliable.  In the picture above, one of my lights had died, leaving my butt half-illuminated. The lights did not get too hot and thankfully my butt did not light on fire.

I created my wings with two metal hangers, electric tape and a ripped pair of fishnets.  I used the waist bands from the fishnets as the straps for my wings. I created my feelers with a Dollar Store hard headband, pipe cleaners, electric tape, cardstock, glitter and Mod Podge.

I love makeup, so I drew organic swirls on one side of face in yellow, green, white and black eyeliners. People were confused by my costume and kept asking me if I was a bee or a wasp all night, but I would just hit my butt light on and they would understand. I couldn't sit on anything but stools all night, but it was still fun!

This year I am going to be a lion. I want a huge MANE.  What are you going to be?