Hello World! Can Can Dancer has moved. Please visit www.cancandancer.com to see new DIY posts (and all past posts too!). Happy Crafting!

15 Minute Fringe Top


Hello World,

I saved a fringe top to my Pinterest a while ago because it looked like a DIY version would be pretty simple. Here’s a link to the original shirt. It wasn’t until a fellow Pinterester commented on it, asking for a tutorial that I actually tried it out.  It was really easy to do, and if I didn’t pause to take pictures of my process, it could totally be done in less than 15 minutes.

I decided to spruce mine up with some gold beads, but you also could dip-dye the fringe, weave it, ect. Check out the tutorial below:


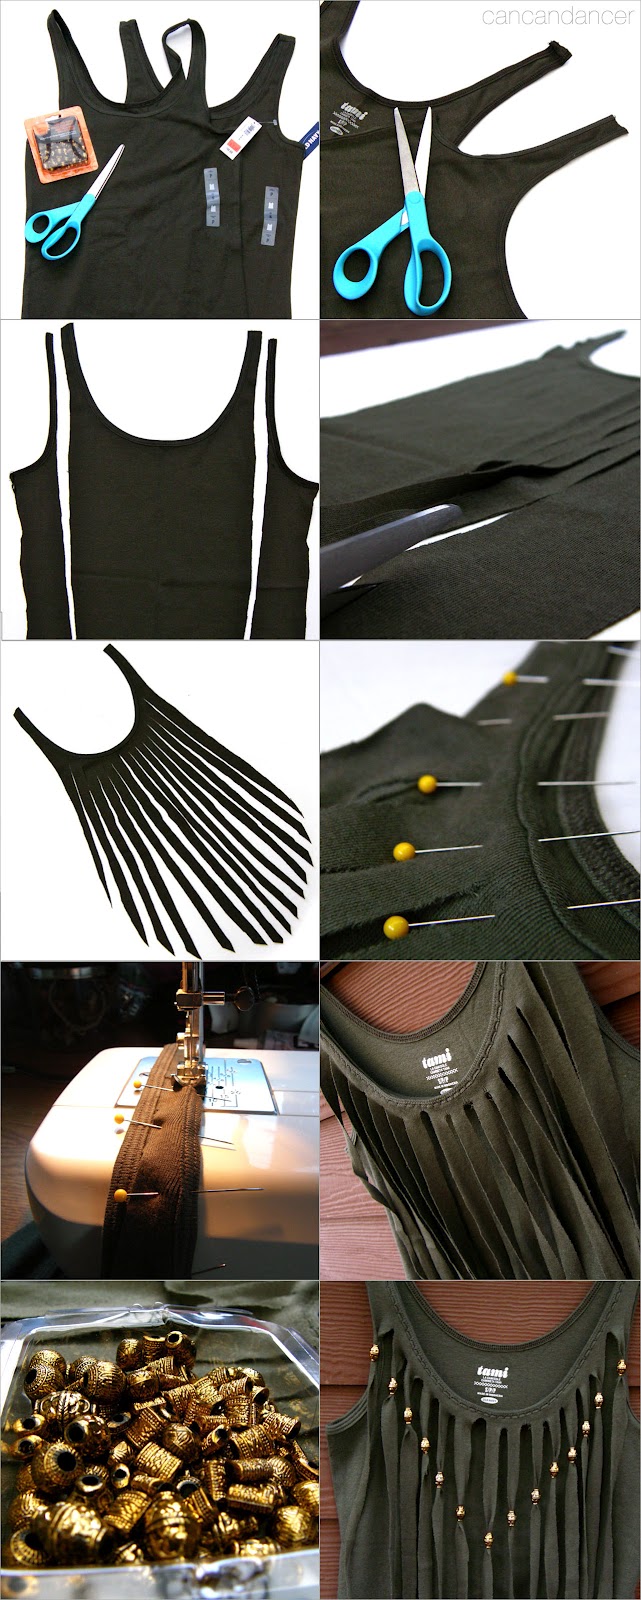
1.   You will need 2 identical tops (or two different colors if you want a contrasting fringe.)  You also will need scissors, a sewing machine (or a needle with matching thread), and pony beads.

2.   Take one of your tank tops and cut it apart. I cut up both side seams and the straps- this creates a back piece and a front piece.  For this tutorial we will only need the front piece.

3.   Cut out a long bib shape from your front piece.  The ending shape of your fringe will depend on what this initial shape is.

4.  With scissors, cut your fringe vertically, making sure not to cut through the neckline.

5.  Your fringe bib is now complete.  In most cases, you would need to gently pull at each fringe to make it curl up on itself- but my shirt's stretch was in the wrong direction. A standard tshirt should curl up very nicely when you tug on it.

6.   Pin your bib to the front of your other tank top, lining the two necklines up exactly, with both right sides facing up.  

7.   Either hand sew or use your sewing machine. Use a zig zag or stretch stitch.

8.   You could be finished at this point if you wish, and just skip the bead steps.

9.   To add beads to each fringe, twist each fringe tip so it goes through the bead easier.  I bought my gold pony beads from Michael's. Make sure you buy beads with large enough holes. (Think beads similar to summer camp)

10.  Tada! You have a new top in less than 15 minutes! Add as many rows of beads as you wish, and if you are worried about them coming off simply tie a knot below each bead to secure it.

Here is the top without the beads.  Nice and simple!

I really like the look with the beads. I might add a few more rows to bling it out a little more.

These tanks tops were pretty cheap!  Only $3.49 each at Old Navy.  If you wait for one of their Extra 50% off clearance sales, it would be a super cheap project!  You even could use old tshirts for this project.

PS Thanks Alaysia for the suggestion for a tutorial!  If anyone else has a tutorial suggestion, just let me know!  Happy Crafting!


Windowsill Garden

I started a garden outside this summer, but all the Walmart plants I bought croaked two weeks after planting them.  I'm guessing my plants either died because: they were watered during the day, the dirt is nutrient-deprived (even weeds don't grow in it!), or the plants were packed with pesticides and not the slightest amount 'natural.'

My indoor garden has been very successful though! I have a baby aloe plant from one of my friends, and greens onions from the supermarket that I put in a cup of water (they grow like crazy even after you cut them). I also have a tropical plant I bought back in June (it was so tiny when I first got it!), a succulent I repotted after it spawned too many children, and a basil plant also from the grocery store. 

I love my little garden, it sits right in the sunshine and makes me feel like I have a little green thumb.


I love basil. It hands-down is my favorite herb.  Recipes taste so much better with fresh basil.  It is great in sauces, soups, salads, ect.

What else could you creatively put a plant in? I know I love putting plants in tea cups!

Cheesy Beef Stroganoff

Here is another recipe I found via Pinterest: link. It was pretty good and really easy to make.  (It reminds me of hamburger helper) The recipe calls for Velveta, but I instead used a mixture of shredded sharp cheddar and pepper jack (my favorite cheese!)  I also added red pepper flakes while melting the cheese- to kick it up a notch.

Try it out! My boyfriend gobbled it down. 


Parmesan Knots & Egg Drop Soup

I found this recipe on Pinterest: Link.  They were really easy to make, and sooooo delicious.  I did have to cook mine for 13 minutes instead of 8-10mins because mine were still raw inside. Try them out!


I also made this egg drop soup recipe: Link. I didn't include the corn kernels though. My boyfriend loved it.


Yes, I understand that these recipes are from two different cuisine groups, but garlic bread goes with everything in my opinion.  Just a little cuisine fusion. :) 

New Tags!

I finally remade my product tags.  I printed them at Office Depot.  I used their thickest glossy paper, but I still wish they were as thick as my Moo business cards.

My previous tags were just colored card-stock with black font on them.  I think these ones look much more professional, and now my blog/etsy/facebook page are much more cohesive. 


This white flower is my favorite one!  I love how simple it is!  Link

DIY with iron-on glitter sheets

The FashionArtProjects team sent me a couple of free goodies, including these Iron-On Glitter Sheets. Usually, I have only seen iron-on decal letters, and I was really excited when I opened up my mail to find these! I love them because you can iron-on any design you can possibly think of! I created a CanCanDancer logo tshirt with the silver sheet.  


Check out below to see how to use the sheets as well:


1.   Follow the instructions and use the sheets on a shirt that was washed without fabric softener.  I bought this shirt at Old Navy for less than $5.  Draw or trace your design onto the glitter paper (with the pastic film still adhered.) 

2.   Cut out your design with scissors or an exacto knife.  I originally decided to include the flower hair piece in my logo, but then realized my exacto knife was MIA.  Remove the plastic film after cutting.  Place right side up on your shirt.  Place a piece of cotton between the decal and your iron- so it doesn't stick to your iron.  Iron the top side, then turn your shirt inside out and iron the back side to secure it.

3.  Allow to cool and tada!  Imagine what else you could make!  I am probably going to salvage the scraps by cutting out geometric shapes and ironing them onto a tanktop.

Happy Crafting!

DIY wax scent pods

Hello World! I bought a bunch of candles at Bath and Body Works during their Semi-Annual sale, and have burned all of them down to the very end of the wicks.  There is still a nice chunk of wax in the bottom, so I reused the wax and made scent pods.

I bought a candle warmer at Shopko about a week ago for $9 on clearance, and it came with 2 wax bars in the kit.  I thought I would use up my old candle wax before opening a new wax package. Also, by cleaning the leftover wax out, you can repurpose the glass containers!

Here is a tutorial for making cute wax pods with Dollar Store ice cube trays!


Check out below to make some as well:


1.  You will need: a wax warmer w/dish, burned down candle, ice cube tray and a spoon.

2.  Start scooping the leftover wax out of your candle with the spoon. If your wax is really strong, use a butter knife instead.

3.   Place all the wax chunks (and the small chunks too) you scooped out into your candle warmer. 

4.   Soak your empty candle container and spoon in hot water and soap, and scrub with a brillo pad. Be careful to not get wax down your drain as it can clog your plumbing.  If you are worried, pour the dirty water into an old bottle or pour it through a fine-mesh screen.

5.   Wait for your wax to melt, and the burnt remains should sink to the bottom of the now liquid wax.

6.   Slowly pour the melted wax into the ice cube tray. Wear an oven mitt if your candle warmer dish is too hot.

7.   Allow to cool in the fridge or freezer (depending on how patient you are)  The wax should solidify very quickly.

8.   Pop the pods out and tada!  Whenever you want to use the scent, just place in your candle warmer and enjoy!

You could also melt the candle wax by placing the candle container (prior to scooping) in a saucepan pan full of boiling water and allow it to remelt on simmer.  You then could pour the melted wax straight into the ice cube trays and have less to scrub in the sink. I didn't do this method because I would rather leave a candle warmer going while I take a shower than have my stove running unattended.

Or is you have a smaller candle just remove the melting plate and place the candle straight on the warmer to melt.  My 3-wick was to large to melt that way- trust me I tried. :)

These could be a really easy gift (tied in a cute baggy with a bow) for a birthday or holiday. I reused my candle jars and placed crafting notions/beads inside them.  The jars look so pretty with the lids on my desk! 

Happy Crafting!

Glitter Guitar Painting

My dad is the hardest person to shop for. His favorite things are: Corvettes, guitars, and anything relating to computers (mostly Apple.) Being on a college-student budget, I cannot buy him any of those things. He does appreciate the handmade, so I painted him a guitar for his birthday.

I creeped on my Dad's facebook and looked at the pictures he had on there because I couldn't remember what guitars he even had.  I saw that he had an older Fender Strat- an iconic guitar and I went with that.


I first painted the background using cheap Michael's paint. I would recommend using nice acrylic paint because the black was kinda muddy and mixed weird with the blue. I painted the lightest area first and worked my way out.

I then tried to paint the guitar bright yellow, but my paint was really translucent (even with a dab of white added to it.) I did four coats and was not happy with the streaks.  ( I even was using nice yellow paint!) I then covered the yellow body of the guitar with Mod Podge and poured glitter on top of it. (I first tried to mix glitter and Mod Podge together, but it would take 4-5 layers to cover it completely.)

I did two layers of the Mod Podge and glitter and let it dry out in the sun.  I then painted the fretboard and the pick-guard. (I know they aren't perfect, my paint coagulated and my hand was not steady at all that day.)

The painted guitar areas looked really flat next to the glitter, so I did a layer of glossy Mod Podge over it.  Because my hands were't very steady, I knew it would be impossible to paint the strings, so I instead hot glued 3 wooden beads to the dry canvas, and looped silver elastic thread through them.  Next I hot glued the tail ends to the back/top of the canvas. (Yes I know electric guitars do not have knobs typically, but it does the job.)

It is super shimmery in the sun, and is less orangey in person.  Imagine what other paintings could be fixed/updated with glitter!

Happy Crafting!


PS Happy Birthday Dad!  I love you!


Moo MiniCards!

I received an email from Etsy saying I could receive 100 free MiniCards for my store.  They just arrived today!  They came in a cute box, with 20 of each of my designs.  With the MiniCards, you are able to pick up to 100 different designs if you want, but I just stuck with 5.

If you have an Etsy store, I would recommend getting some too!  The shipping was only $5 and they are really nice quality.  The font and images are really crisp, and the cardstock is nice and thick.

I probably will order from them in the future due to the quality. I usually print my own at home or at Office Depot, but the image quality and paper thickness is never as thick as I would like.

To get your own: click here.


They were free (except shipping) because they have the Etsy logo on them.


PS. I was not paid in anyway to talk about these, I just was really excited about them. :)

From the Junk Drawer+100 Followers!

Hello World!  I apologize for not having a new post for almost a month now!  School started up again, and being my final year, there was no easing into the assignments and projects. I also am working two part-time jobs, so I have little-to-no free time.

I am really excited to say that Can Can Dancer now has 100 followers on Blogger!  To the random person who pinned my neon t-shirt reconstruction on June 14th- Thank you!  That was the moment I actually started getting traffic.  I have had this blog since 2008, and up until June 14th, 2012 I only had 10,000ish views. Now I have had over 308,000 views!

Here is are some pieces I recently made. I have broken necklaces, keychains and earrings and I finally gave some of them new life.

Check out below!

You may have seen this button on one of my zipper flowers.  It seems really high quality, and might even be from an old uniform.  I used it for the closure on this wrap bracelet. I bought leather cording and the turquoise beads at Michael's.  Making wrap bracelets is really time consuming, so if you try to make one, do it while watching a long movie. :)


I finally bought some earring posts. I bought a new type of glue, and this is my guinea-pig pair. I have been wearing them everyday (even in my sleep) to see how the glue holds up. If the glue is strong, I wil be making earrings for Etsy soon. 


I bought some filigree ring bases, and I am testing them out as well.  Last year I bought a nice pair of fused-glass post earrings, and I lost one while walking to class. I took a shortcut through a grassy lawn that day, and was never able to find the missing earring.  I took pliers, yanked the post off, and then glued it to the ring base.  The ring base has not turned my finger green and is really comfortable (and adjustable).  Once this one makes it past inspection, I'll start using these bases for Etsy as well.

This cute little butterfly is from a broken keychain. (At least I think that is what is was.  My friends like to give me their broken accessories instead of throwing them away...) I bought bobby-pin bases and man they are study. Once I have ore free time I will start making sets and selling them on Etsy as well.

These ones are actually made with old buttons. 

These ones are made with vintage buttons as well.

As you can see, I have a large crafting to-do list ahead of me. I have a day or two off next week, so I actually might get to have a crafternoon for once!

Happy Crafting!