Hello World,
Can Can Dancer has moved! All new blog posts will be on my new site from now on. I also have moved all my past blog posts over there, and am updating the 'tutorials' page.
If you follow via Bloglovin, you will soon be redirected to the new site. If you follow via GFC, I highly recommend following via Bloglovin, so you don't miss any future posts!
Check it out: www.cancandancer.com
Hello World! Can Can Dancer has moved. Please visit www.cancandancer.com to see new DIY posts (and all past posts too!). Happy Crafting!
DIY Gold & Lace Flower Pots
Hello World,
Spring is right around the corner, and I am so ready for it. Even though this winter wasn't very harsh, I have always been a warmer weather girl. Today's project is perfect if you want to bring some spring inside your home. Check out the tutorial below to make your own gold and lace flower pots:
1. Gather your supplies: flower pots (I bought a 3-pack at Dollar Tree), spray paint, lace trim, Mod Podge, a brush, clear gloss spray paint (not pictured), and scissors (not pictured).
2. At first, I just spray painted my flower pots gold. Well, the paint didn't stick and dusted off when I touched them. I then sprayed them with clear spray paint and allowed that to dry.
3. I then spray painted them gold, and the paint did stick. Allow colored paint to dry.
4. Apply Mod Podge to your flower pot lip.
5. Place your lace trim where you applied the Mod Podge. Trim lace so it barely overlaps.
6. Apply Mod Podge on top of the lace. Allow to dry.
7. Fill with soil and add some happy little plants.
Happy Crafting!
Spring is right around the corner, and I am so ready for it. Even though this winter wasn't very harsh, I have always been a warmer weather girl. Today's project is perfect if you want to bring some spring inside your home. Check out the tutorial below to make your own gold and lace flower pots:
1. Gather your supplies: flower pots (I bought a 3-pack at Dollar Tree), spray paint, lace trim, Mod Podge, a brush, clear gloss spray paint (not pictured), and scissors (not pictured).
2. At first, I just spray painted my flower pots gold. Well, the paint didn't stick and dusted off when I touched them. I then sprayed them with clear spray paint and allowed that to dry.
3. I then spray painted them gold, and the paint did stick. Allow colored paint to dry.
4. Apply Mod Podge to your flower pot lip.
5. Place your lace trim where you applied the Mod Podge. Trim lace so it barely overlaps.
6. Apply Mod Podge on top of the lace. Allow to dry.
7. Fill with soil and add some happy little plants.
Happy Crafting!
DIY Moss Typography
Hello World,
Let's be honest. I have a typography problem. I love both sans serif and scripted typefaces. I sometimes pay more for a product just because it has great packaging. I know, #designerproblems. My hands-down favorite is Futura, and I use it for all my blog/Etsy branding. (Fun fact- Futura is so cool it actually is on the moon!)
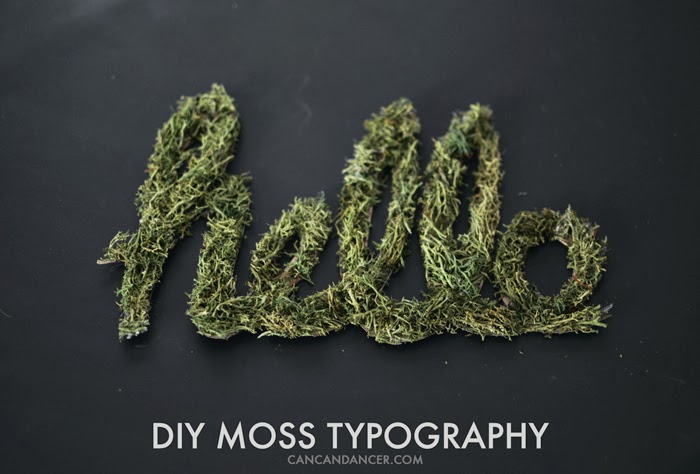
Now that I have put that on the table, you can see why I am really excited to share today's tutorial. This is a quick project that only cost me a dollar. I decided to go with handwritten lettering, and a simple "hello."
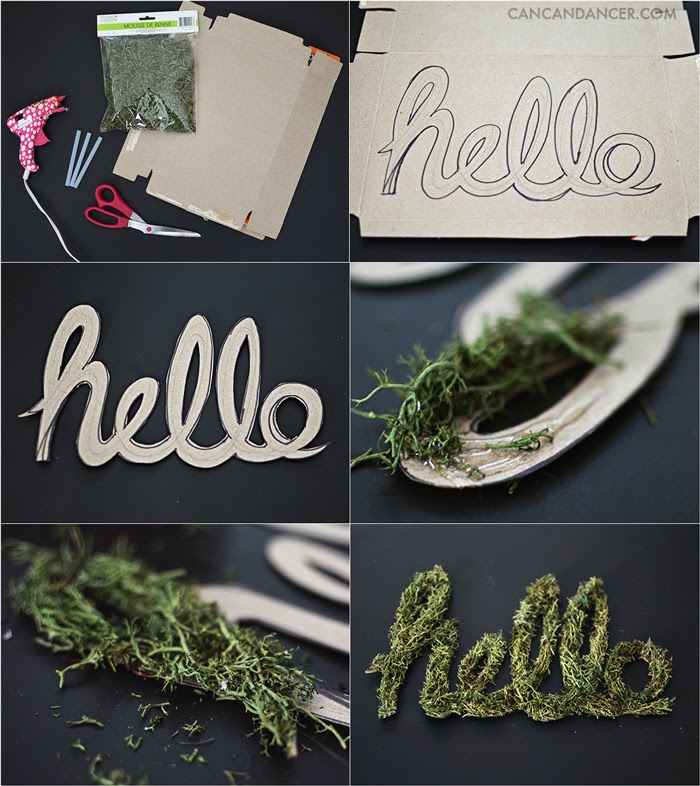
1. Gather your supplies: artificial moss (I got mine for $1 at Dollar Tree), an old cereal box, scissors, hot glue gun, and glue sticks.
2. Print or draw out your word on the cardboard. It is okay if you have drawing errors, as you will be covering them later.
3. Cut out your word with scissors. If you have trouble cutting with the inside of some letters, try using an X-Acto knife.
4. Apply hot glue to your cardboard. Press moss onto the area, being careful not to burn yourself.
5. Continue for the rest of your word.
6. If your edges are messy, give your word a little trim.
And tada! You could either glue this to a canvas, or just place on a shelf. Mine is on a windowsill and doesn't flop over.
Happy Crafting!
PS. Please do not ever use Papyrus. Find something way better for free at www.fontsquirrel.com.
Let's be honest. I have a typography problem. I love both sans serif and scripted typefaces. I sometimes pay more for a product just because it has great packaging. I know, #designerproblems. My hands-down favorite is Futura, and I use it for all my blog/Etsy branding. (Fun fact- Futura is so cool it actually is on the moon!)
Now that I have put that on the table, you can see why I am really excited to share today's tutorial. This is a quick project that only cost me a dollar. I decided to go with handwritten lettering, and a simple "hello."
1. Gather your supplies: artificial moss (I got mine for $1 at Dollar Tree), an old cereal box, scissors, hot glue gun, and glue sticks.
2. Print or draw out your word on the cardboard. It is okay if you have drawing errors, as you will be covering them later.
3. Cut out your word with scissors. If you have trouble cutting with the inside of some letters, try using an X-Acto knife.
4. Apply hot glue to your cardboard. Press moss onto the area, being careful not to burn yourself.
5. Continue for the rest of your word.
6. If your edges are messy, give your word a little trim.
And tada! You could either glue this to a canvas, or just place on a shelf. Mine is on a windowsill and doesn't flop over.
Happy Crafting!
PS. Please do not ever use Papyrus. Find something way better for free at www.fontsquirrel.com.
Spray paint all the things!
Hello World,
Spray paint can work wonders. In just a few minutes, you can transform a thrifted item into a chic piece of home decor. I also recently bought my first can of chalkboard paint, and am now obsessed. I keep finding more and more items to make into chalkboards.
I bought the plaque above at a thrift store, spray painted it with a glossy white paint, and then added two layers of chalkboard paint to the center. It also has a hanging mechanism on the back, so now I just need to decide what room to hang it in.
In my spray painting frenzy, I randomly grabbed a starfish off my bookshelf and painted it gold. Next thing you know, I'm grabbing the rest of them and painting them each a different metallic color. I love how metallic spray paint makes items look more expensive.
I previously did posted tutorial for creating ombre/gradient vases. I used the same technique on these $0.25 vases I bought at a thrift store. Now I am just waiting for spring so I can pop some fresh flowers from my yard in them.
Happy Crafting!
Spray paint can work wonders. In just a few minutes, you can transform a thrifted item into a chic piece of home decor. I also recently bought my first can of chalkboard paint, and am now obsessed. I keep finding more and more items to make into chalkboards.
I bought the plaque above at a thrift store, spray painted it with a glossy white paint, and then added two layers of chalkboard paint to the center. It also has a hanging mechanism on the back, so now I just need to decide what room to hang it in.
In my spray painting frenzy, I randomly grabbed a starfish off my bookshelf and painted it gold. Next thing you know, I'm grabbing the rest of them and painting them each a different metallic color. I love how metallic spray paint makes items look more expensive.
I previously did posted tutorial for creating ombre/gradient vases. I used the same technique on these $0.25 vases I bought at a thrift store. Now I am just waiting for spring so I can pop some fresh flowers from my yard in them.
Happy Crafting!
Labels:
chalkboard,
decor,
DIY,
home,
metallic,
paint,
spray paint
Subscribe to:
Posts (Atom)