Hello World! Can Can Dancer has moved. Please visit www.cancandancer.com to see new DIY posts (and all past posts too!). Happy Crafting!
Showing posts with label decor. Show all posts

DIY Gold & Lace Flower Pots

Hello World,

Spring is right around the corner, and I am so ready for it. Even though this winter wasn't very harsh, I have always been a warmer weather girl. Today's project is perfect if you want to bring some spring inside your home. Check out the tutorial below to make your own gold and lace flower pots:


1. Gather your supplies: flower pots (I bought a 3-pack at Dollar Tree), spray paint, lace trim, Mod Podge, a brush, clear gloss spray paint (not pictured), and scissors (not pictured).

2. At first, I just spray painted my flower pots gold. Well, the paint didn't stick and dusted off when I touched them. I then sprayed them with clear spray paint and allowed that to dry.

3. I then spray painted them gold, and the paint did stick. Allow colored paint to dry.

4. Apply Mod Podge to your flower pot lip.

5. Place your lace trim where you applied the Mod Podge. Trim lace so it barely overlaps.

6. Apply Mod Podge on top of the lace. Allow to dry.

7. Fill with soil and add some happy little plants.

Happy Crafting!

Spray paint all the things!

Hello World,

Spray paint can work wonders. In just a few minutes, you can transform a thrifted item into a chic piece of home decor. I also recently bought my first can of chalkboard paint, and am now obsessed. I keep finding more and more items to make into chalkboards.


I bought the plaque above at a thrift store, spray painted it with a glossy white paint, and then added two layers of chalkboard paint to the center. It also has a hanging mechanism on the back, so now I just need to decide what room to hang it in.


In my spray painting frenzy, I randomly grabbed a starfish off my bookshelf and painted it gold. Next thing you know, I'm grabbing the rest of them and painting them each a different metallic color. I love how metallic spray paint makes items look more expensive.


I previously did posted tutorial for creating ombre/gradient vases. I used the same technique on these $0.25 vases I bought at a thrift store. Now I am just waiting for spring so I can pop some fresh flowers from my yard in them.

Happy Crafting!

DIY Valentine Decor

Hello World,

My latest Etsy Treasury and this video inspired the DIY project below.


When I began this project, I just started making paper roses, without a plan for what I was going to glue them on. I figured once I made a decent pile of them, it would dawn on me.

After making it through a few episodes of The Originals (I actually like it way more than Vampire Diaries), my coffee table was covered with paper roses and scraps. Fast forward a few days, and those paper roses were still piled on my coffee table, waiting to be utilized.

I wanted to glue them to something inexpensive, so I went thrift shopping and to a dollar store (where I picked up a shelf liner). I originally was going to glue the roses to the shelf liner, but just ended up making more roses with it. I just love the textured roses!

Fast forward a few more days and it dawns on me. I have a pizza box in my recycling bin. I could glue all these roses to it instead of a canvas. Thankfully one of my New Year's resolutions wasn't to avoid carbohydrates. Check out the inexpensive tutorial below:


1. Gather your supplies: paper or various materials (lace, burlap, a shelf liner, etc), a hot glue gun, glue sticks, scissors, a base to glue the roses to (hello pizza box!), and spray paint.

2. Make all your roses by cutting out paper swirls and twirling them into a rose shape. Check out this video tutorial for a better explanation.

3. I spray painted the lid to my pizza box white. This way if there were gaps between my roses, the brown cardboard wouldn't be visible.

4. Trim your cardboard, draw out your design, and start hot glueing your roses down.

5. Continue glueing until the cardboard is completely covered.

6. Tada! You have some super inexpensive Valentine decor!


I think I'll make another version of this, and glue burlap roses to some old barn wood. Maybe I'll make a giant cursive monogram.

Happy Crafting!

Shabby Chic Chandelier/Wind Chime

Hello World,

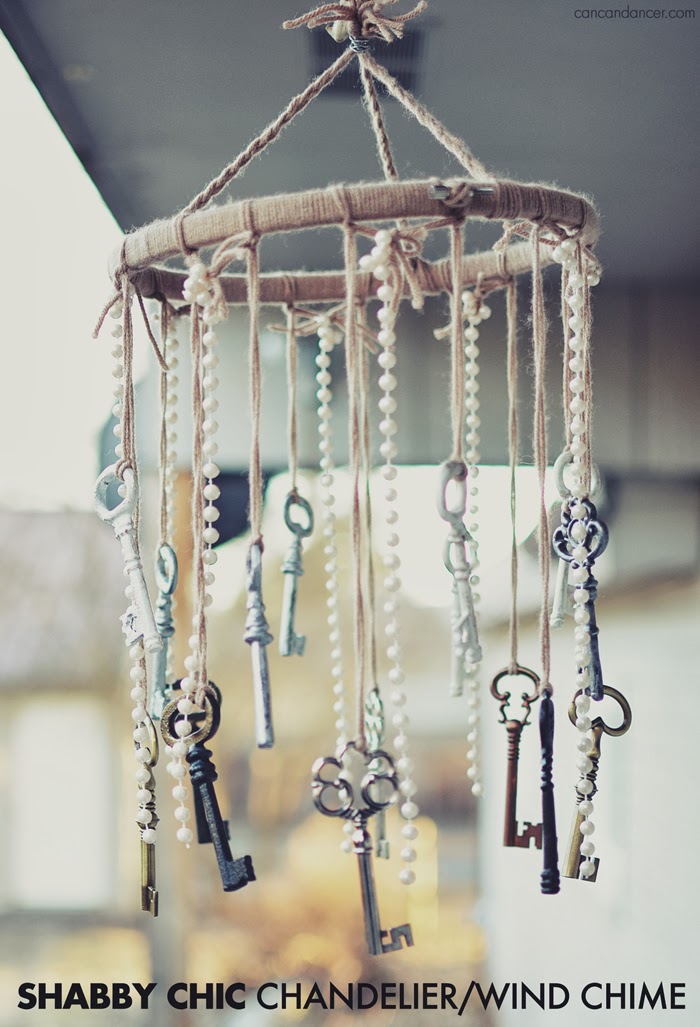
One of my friends gave me a bunch of keys for my birthday last year and a few more for Christmas this year, and I finally got around to using them to make some home decor.

I made a shabby chic chandelier/wind chime with the keys (she got them from Michael's) and some pearl garland I picked up at a yard sale for $0.50. Below is just the first stage of it. I probably will add more beads, tiers, and lace trim to it as I come across them while thrift shopping.


Check out the tutorial below to see how to make your own:


1. Gather your supplies: large keys, beads or pearl garland, scissors, yarn, an embroidery hoop, pliers, and wire.

2. Star off by knotting the tail end of your yarn to your embroidery hoop.

3. Wrap the yarn around the embroidery hoop, covering the tail end as you work your way around the hoop.

4. Continue wrapping yarn around your hoop until it is completely covered. 

5.  Loop some yarn through your first key, and pull the tail ends through the loop you created, catching the key in the loop. Tie this first key strand to your embroidery hoop.

6.  Continue with more keys, equally spacing them out. I used the silver/white keys for the shorter tier of my chandelier.

7.  Continue adding keys to your hoop until you are satisfied. I did alternating lengths for my keys.

8.  With the tail ends of each of the key strands, I tied them to their nearest neighbor. I tied my pearl strands to these yarn loops. Trim the tail ends if you wish, but I left mine long in case I decide to add more beads in the future.

9. Cut out 9 pieces of yarn that are all the same length. Place them in groups of three, fold them in half and loop them around the embroidery hoop. 

10.  Braid each of these yarn groups and knot the ends. (If you want a more secure chandelier, you can use the wire as your hanging mechanism instead of yarn.)

11.  Bring your three braids ends together and secure them by wrapping wire around them. 

12.  I created a small wire loop and attached this to my wire wrapping to be used as a hanging point. Add more materials to your chandelier if you want it more complex, hang, and enjoy!


Happy Crafting!

Hearts. Paper Hearts Everywhere.

Hello World,

It's that time of year again! Time for pink and red decorations everywhere!

My birthday is in February, and my mom would always plaster paper hearts all over the house when I was little. I continue this traditional in my own house now that I'm older, as it reminds me of happy childhood birthdays, and also because I just love decorating for holidays.

I hung up my sheet music garland and pom pom yarn up again this year. See the tutorial to make the paper garland here. I hung paper hearts all over my kitchen cabinets, and some of them are even made from Victoria's Secret shopping bags!


Now the snow just needs to go away so summer can hurry up and get here! Happy Crafting!

PS- Any other single ladies like Valentine's Day too?

Autumn Leaves Garland

Hello World,

I have two large maple trees in my yard, and they shed a decent amount of leaves every year. This year instead of making fall decor with paper leaves, I made garland with real leaves. The garland will eventually completely die, but while it is still alive, it will transform in appearance with the different stages of fall.

Check out the simple tutorial below:


1. Gather your leaves. Pick freshly fallen leaves so your garland will have a slightly longer life.

2. Check for bugs and allow your leaves to dry if they are wet.

3. Sew through your leaves with a long straight stitch, allowing an inch or two between each leaf of threading. I sewed my leaves at random angles so they would resemble the actual act of falling.

4. Tie knots at the ends of your garland to secure the end leaves.

5. Hang and enjoy it as it changes in appearance.

Happy Crafting!