Hello World,
Spring is right around the corner, and I am so ready for it. Even though this winter wasn't very harsh, I have always been a warmer weather girl. Today's project is perfect if you want to bring some spring inside your home. Check out the tutorial below to make your own gold and lace flower pots:
1. Gather your supplies: flower pots (I bought a 3-pack at Dollar Tree), spray paint, lace trim, Mod Podge, a brush, clear gloss spray paint (not pictured), and scissors (not pictured).
2. At first, I just spray painted my flower pots gold. Well, the paint didn't stick and dusted off when I touched them. I then sprayed them with clear spray paint and allowed that to dry.
3. I then spray painted them gold, and the paint did stick. Allow colored paint to dry.
4. Apply Mod Podge to your flower pot lip.
5. Place your lace trim where you applied the Mod Podge. Trim lace so it barely overlaps.
6. Apply Mod Podge on top of the lace. Allow to dry.
7. Fill with soil and add some happy little plants.
Happy Crafting!
Hello World! Can Can Dancer has moved. Please visit www.cancandancer.com to see new DIY posts (and all past posts too!). Happy Crafting!
Showing posts with label DIY. Show all posts
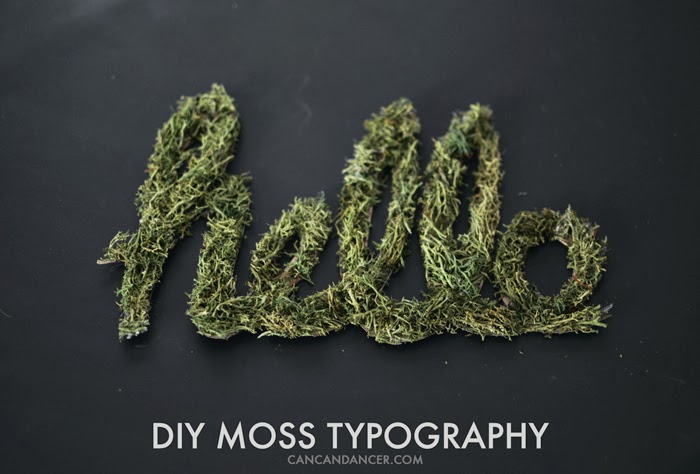
DIY Moss Typography
Hello World,
Let's be honest. I have a typography problem. I love both sans serif and scripted typefaces. I sometimes pay more for a product just because it has great packaging. I know, #designerproblems. My hands-down favorite is Futura, and I use it for all my blog/Etsy branding. (Fun fact- Futura is so cool it actually is on the moon!)
Now that I have put that on the table, you can see why I am really excited to share today's tutorial. This is a quick project that only cost me a dollar. I decided to go with handwritten lettering, and a simple "hello."
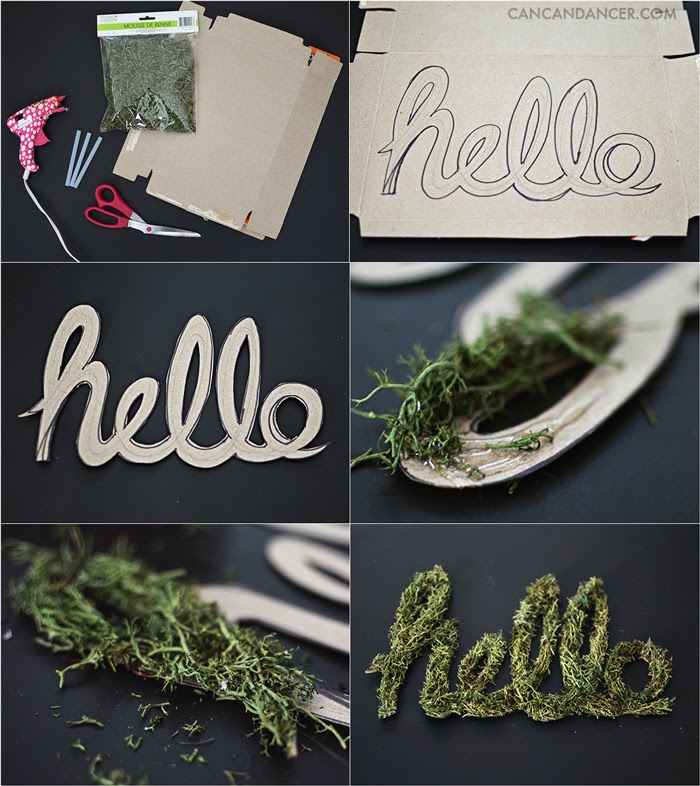
1. Gather your supplies: artificial moss (I got mine for $1 at Dollar Tree), an old cereal box, scissors, hot glue gun, and glue sticks.
2. Print or draw out your word on the cardboard. It is okay if you have drawing errors, as you will be covering them later.
3. Cut out your word with scissors. If you have trouble cutting with the inside of some letters, try using an X-Acto knife.
4. Apply hot glue to your cardboard. Press moss onto the area, being careful not to burn yourself.
5. Continue for the rest of your word.
6. If your edges are messy, give your word a little trim.
And tada! You could either glue this to a canvas, or just place on a shelf. Mine is on a windowsill and doesn't flop over.
Happy Crafting!
PS. Please do not ever use Papyrus. Find something way better for free at www.fontsquirrel.com.
Let's be honest. I have a typography problem. I love both sans serif and scripted typefaces. I sometimes pay more for a product just because it has great packaging. I know, #designerproblems. My hands-down favorite is Futura, and I use it for all my blog/Etsy branding. (Fun fact- Futura is so cool it actually is on the moon!)
Now that I have put that on the table, you can see why I am really excited to share today's tutorial. This is a quick project that only cost me a dollar. I decided to go with handwritten lettering, and a simple "hello."
1. Gather your supplies: artificial moss (I got mine for $1 at Dollar Tree), an old cereal box, scissors, hot glue gun, and glue sticks.
2. Print or draw out your word on the cardboard. It is okay if you have drawing errors, as you will be covering them later.
3. Cut out your word with scissors. If you have trouble cutting with the inside of some letters, try using an X-Acto knife.
4. Apply hot glue to your cardboard. Press moss onto the area, being careful not to burn yourself.
5. Continue for the rest of your word.
6. If your edges are messy, give your word a little trim.
And tada! You could either glue this to a canvas, or just place on a shelf. Mine is on a windowsill and doesn't flop over.
Happy Crafting!
PS. Please do not ever use Papyrus. Find something way better for free at www.fontsquirrel.com.
Spray paint all the things!
Hello World,
Spray paint can work wonders. In just a few minutes, you can transform a thrifted item into a chic piece of home decor. I also recently bought my first can of chalkboard paint, and am now obsessed. I keep finding more and more items to make into chalkboards.
I bought the plaque above at a thrift store, spray painted it with a glossy white paint, and then added two layers of chalkboard paint to the center. It also has a hanging mechanism on the back, so now I just need to decide what room to hang it in.
In my spray painting frenzy, I randomly grabbed a starfish off my bookshelf and painted it gold. Next thing you know, I'm grabbing the rest of them and painting them each a different metallic color. I love how metallic spray paint makes items look more expensive.
I previously did posted tutorial for creating ombre/gradient vases. I used the same technique on these $0.25 vases I bought at a thrift store. Now I am just waiting for spring so I can pop some fresh flowers from my yard in them.
Happy Crafting!
Spray paint can work wonders. In just a few minutes, you can transform a thrifted item into a chic piece of home decor. I also recently bought my first can of chalkboard paint, and am now obsessed. I keep finding more and more items to make into chalkboards.
I bought the plaque above at a thrift store, spray painted it with a glossy white paint, and then added two layers of chalkboard paint to the center. It also has a hanging mechanism on the back, so now I just need to decide what room to hang it in.
In my spray painting frenzy, I randomly grabbed a starfish off my bookshelf and painted it gold. Next thing you know, I'm grabbing the rest of them and painting them each a different metallic color. I love how metallic spray paint makes items look more expensive.
I previously did posted tutorial for creating ombre/gradient vases. I used the same technique on these $0.25 vases I bought at a thrift store. Now I am just waiting for spring so I can pop some fresh flowers from my yard in them.
Happy Crafting!
Labels:
chalkboard,
decor,
DIY,
home,
metallic,
paint,
spray paint
DIY Chain & Braid Necklace
Hello World,
When I go shopping at the mall, I don't just look for items I can wear as is. I look through clearance sections for items that I can repurpose, update, or easily fix. I love it when I find a dress that has a broken strap or a missing button. I can fix that in no time and get a great deal.
Sometimes it can be a better deal to buy an item and dissect than to go buy the supplies at a craft store. Last week, I went to Rue 21 and found a heavy gold chain bracelet for only $2. The only problem was it was way too big for my wrist. I simply removed the lobster clasp and repurposed the chain to make a necklace:
1. Gather your supplies: chain, jewelry cord, scissors, and a ruler.
2. Cut six strands of jewelry cord. I made each of my cords 34 inches long.
3. Fold three of the cords in half and feed these loops through one end of your chain.
4. Bring the tail ends of the cords through the cord loop and pull tightly.
5. Due to the loop, you will have 6 pieces of cord to work with. You can either braid two small braids, or one thicker braid.
6. Tie a knot at the end and repeat this process for the other side of your necklace.
7. Trim the tail ends of your braids.
8. Wrap some jewelry cord around both braids, and tie knots to secure it. If you are worried about it coming undone, add some glue to secure it.
Happy Crafting!
When I go shopping at the mall, I don't just look for items I can wear as is. I look through clearance sections for items that I can repurpose, update, or easily fix. I love it when I find a dress that has a broken strap or a missing button. I can fix that in no time and get a great deal.
Sometimes it can be a better deal to buy an item and dissect than to go buy the supplies at a craft store. Last week, I went to Rue 21 and found a heavy gold chain bracelet for only $2. The only problem was it was way too big for my wrist. I simply removed the lobster clasp and repurposed the chain to make a necklace:
1. Gather your supplies: chain, jewelry cord, scissors, and a ruler.
2. Cut six strands of jewelry cord. I made each of my cords 34 inches long.
3. Fold three of the cords in half and feed these loops through one end of your chain.
4. Bring the tail ends of the cords through the cord loop and pull tightly.
5. Due to the loop, you will have 6 pieces of cord to work with. You can either braid two small braids, or one thicker braid.
6. Tie a knot at the end and repeat this process for the other side of your necklace.
7. Trim the tail ends of your braids.
8. Wrap some jewelry cord around both braids, and tie knots to secure it. If you are worried about it coming undone, add some glue to secure it.
Happy Crafting!
Going Stag Jewelry Holder
Hello World,
Guess what? I have another Darby Smart kit to show you today! The original kit was designed by Los Angeles-based designer, Joanna Reynolds. I think this kit is such a clever idea for a jewelry holder.
I live in Idaho, and most of my friends have actual animal heads mounted in their living rooms. I am not very outdoorsy, and have never been hunting. I know GASP. I went to a high school where the senior guys wore flannel cutoffs, thought mullets were cool, and would go hunting before school sometimes. It just was never my scene. (Plus, I don't really like the taste of venison.)
So I thought this was a nice alternative to having an actual head mounted in my bedroom, and it can be completely customized to your own style!
The kit originally comes with two mini cans of spray paint, a bunch of gem stones, glue, wire, pliers, a wooden plaque, and a metal hanging hardware. Note: I used other supplies in my stash to make my version.
I originally painted the wooden plaque white and hand painted a realistic deer head on it. I was planning on gluing the gemstones onto the plaque as a necklace design on the deer, but I couldn't get the ears right. In the middle of my perfectionist frustration, I painted the entire plaque black and went with a geometric design instead, in neon colors (using my own acrylic paint).
If you want to try this kit out, but want to paint a design, Darby Smart sells some acrylic paint colors separately too here. I didn't end up using all the supplies from this kit, and will be saving the gem stones for another project.
I really like the gold wire antlers with the brightly painted plaque. Does the fringe necklace above look familiar? That was my original prototype for my Darby Smart kit!
If you think this kit is a rad idea as well, you can check out the original gem-stone-tastic kit here. (I know I've said it a million times, but seriously sign up for their emails or follow them on Facebook, they send/post coupon codes periodically. Who doesn't like a deal?)
Happy Crafting!
PS- Unlike my other kit posts, this was my first complimentary kit from Darby Smart and all opinions are my own.
Guess what? I have another Darby Smart kit to show you today! The original kit was designed by Los Angeles-based designer, Joanna Reynolds. I think this kit is such a clever idea for a jewelry holder.
I live in Idaho, and most of my friends have actual animal heads mounted in their living rooms. I am not very outdoorsy, and have never been hunting. I know GASP. I went to a high school where the senior guys wore flannel cutoffs, thought mullets were cool, and would go hunting before school sometimes. It just was never my scene. (Plus, I don't really like the taste of venison.)
So I thought this was a nice alternative to having an actual head mounted in my bedroom, and it can be completely customized to your own style!
![]() |
| Darby Smart even included this super cute lollipop in the Valentine's Day spirit! |
I originally painted the wooden plaque white and hand painted a realistic deer head on it. I was planning on gluing the gemstones onto the plaque as a necklace design on the deer, but I couldn't get the ears right. In the middle of my perfectionist frustration, I painted the entire plaque black and went with a geometric design instead, in neon colors (using my own acrylic paint).
If you want to try this kit out, but want to paint a design, Darby Smart sells some acrylic paint colors separately too here. I didn't end up using all the supplies from this kit, and will be saving the gem stones for another project.
I really like the gold wire antlers with the brightly painted plaque. Does the fringe necklace above look familiar? That was my original prototype for my Darby Smart kit!
If you think this kit is a rad idea as well, you can check out the original gem-stone-tastic kit here. (I know I've said it a million times, but seriously sign up for their emails or follow them on Facebook, they send/post coupon codes periodically. Who doesn't like a deal?)
Happy Crafting!
PS- Unlike my other kit posts, this was my first complimentary kit from Darby Smart and all opinions are my own.
Time for a little (chair) makeover
Hello World,
My mom bought me this chair at a yard sale when I was 11 years old. Since then, it has gained some wear being my craft room chair. My cat loves to use seat cushion to sharpen his claws, I've dripped glue and paint on it, and I've been meaning to give it a makeover for quite some time now.
I started by removing the seat cushion with a screwdriver, and sanding down the wooden frame. I then painted it with primer and two coats of latex paint. (My local Walmart wanted $0.28 for a paint stirrer, when did those stop being free?)
I next gave the seat cushion an update. I simply just laid my seat upside down on some cotton fabric, pulled that fabric tightly over each edge and stapled it into place. I then reattached my seat to my chair with a screwdriver.
The seat might look uncomfortable due to its not-cushiness, but trust me, this baby is pretty dang comfy.
Happy Crafting!
My mom bought me this chair at a yard sale when I was 11 years old. Since then, it has gained some wear being my craft room chair. My cat loves to use seat cushion to sharpen his claws, I've dripped glue and paint on it, and I've been meaning to give it a makeover for quite some time now.
I started by removing the seat cushion with a screwdriver, and sanding down the wooden frame. I then painted it with primer and two coats of latex paint. (My local Walmart wanted $0.28 for a paint stirrer, when did those stop being free?)
I next gave the seat cushion an update. I simply just laid my seat upside down on some cotton fabric, pulled that fabric tightly over each edge and stapled it into place. I then reattached my seat to my chair with a screwdriver.
The seat might look uncomfortable due to its not-cushiness, but trust me, this baby is pretty dang comfy.
Happy Crafting!
Apartment Therapy Homies Awards
Hello World,
I have exciting news! Can Can Dancer has just been nominated for Apartment Therapy's Homies Awards! If you are on the search for new blogs to follow, check out their massive blog lists. It's a great way to find blogs in many categories, including: DIY, Home Design, Family & Kids, Health & Diet, Sweets & Baking, and many more!
Check out the full list of nominations here. Week 1 voting ends Feb 22nd at 5AM. I would love your support! Happy Crafting!
I have exciting news! Can Can Dancer has just been nominated for Apartment Therapy's Homies Awards! If you are on the search for new blogs to follow, check out their massive blog lists. It's a great way to find blogs in many categories, including: DIY, Home Design, Family & Kids, Health & Diet, Sweets & Baking, and many more!
Check out the full list of nominations here. Week 1 voting ends Feb 22nd at 5AM. I would love your support! Happy Crafting!
DIY Birthday Crown
Hello World,
Today is my 24th birthday! This last weekend I celebrated my birthday jointly with my friend Sam (who is two days older than me) and made us birthday crowns. I am a firm believer that age is just a number, and that you should never stifle your inner child.
When I was in junior high I remember looking at college graduates and thinking they were so old. Now that I am that age, I don't feel like a total grown up, but junior high students do look young to me.
Today is my 24th birthday! This last weekend I celebrated my birthday jointly with my friend Sam (who is two days older than me) and made us birthday crowns. I am a firm believer that age is just a number, and that you should never stifle your inner child.
When I was in junior high I remember looking at college graduates and thinking they were so old. Now that I am that age, I don't feel like a total grown up, but junior high students do look young to me.
I decided to embrace my inner child and had a blast making birthday crowns with pipe cleaners and pom poms. Check out the very simple tutorial below:
1. Gather your supplies: pipe cleaners, pom poms, a hot glue gun, and glue sticks.
2. Start by creating the band for your crown. I used two pipe cleaners to create the base ring.
3. Wrap pipe cleaners around the base you created, forming triangle shapes.
4. I did a second tier of triangles to fill the crown out more. On my crown, I added a heart shape.
5. Glue pom poms on as your pretend gems, and enjoy!
I didn't need booby pins to hold my crown on, even while dancing.
So stylish. :)
Happy Crafting!
Gradient Vase from a Bottle
Hello World,
My favorite craft projects involve repurposed materials. I previously showed two techniques for sprucing up vases with spray paint. Check them out here.
Last summer I found a tutorial for cutting bottles with yarn, nail polish remover, and a lighter- and failed miserably. I blogged about my Pinterest fail, and asked for suggestions to succeed next time around. I decided to give the technique another try, and actually succeeded this time!
Check out how to make your own gradient vase below:
1. Gather your supplies: spray paint and a bottle. If you want to try cutting your vase you also will need: nail polish remover, yarn, sandpaper, and a lighter.
2. Remove all labels from your bottle.
3. Wash your bottle. If you have sticker residue, let the bottle soak in sudsy hot water. Load a scrubby with soap and then have at the sticker residue. Dry your bottle.
4. If you want to cut the top of your bottle check out this tutorial. From my experience, I rotated my bottle more quickly, and for more than 30 seconds. Dull down the sharp edges with sand paper. If you don't want to risk accidentally lighting anything on fire, skip this step.
5. In a ventilated area, spray paint your bottle. For a gradient effect, spray more towards the bottle, and quickly work your way up the bottle.
6. Allow to dry. In my last photo, I placed the top of the bottle upside down inside the vase portion to help hold my fake flower stems in place.
My favorite craft projects involve repurposed materials. I previously showed two techniques for sprucing up vases with spray paint. Check them out here.
Last summer I found a tutorial for cutting bottles with yarn, nail polish remover, and a lighter- and failed miserably. I blogged about my Pinterest fail, and asked for suggestions to succeed next time around. I decided to give the technique another try, and actually succeeded this time!
Check out how to make your own gradient vase below:
1. Gather your supplies: spray paint and a bottle. If you want to try cutting your vase you also will need: nail polish remover, yarn, sandpaper, and a lighter.
2. Remove all labels from your bottle.
3. Wash your bottle. If you have sticker residue, let the bottle soak in sudsy hot water. Load a scrubby with soap and then have at the sticker residue. Dry your bottle.
4. If you want to cut the top of your bottle check out this tutorial. From my experience, I rotated my bottle more quickly, and for more than 30 seconds. Dull down the sharp edges with sand paper. If you don't want to risk accidentally lighting anything on fire, skip this step.
5. In a ventilated area, spray paint your bottle. For a gradient effect, spray more towards the bottle, and quickly work your way up the bottle.
6. Allow to dry. In my last photo, I placed the top of the bottle upside down inside the vase portion to help hold my fake flower stems in place.
Ladder Fringe Necklace
Hello World,
I love a good statement necklace. You can wear them layered with a scarf, or by themselves to spruce up an outfit. Check out the tutorial below to see how to make your own bohemian statement necklace:
1. Gather your supplies: pliers, beading pins, beads, jump rings, and chain.
2. I didn't have eye pins in my stash, so I instead made my own by bending the pin around the tip of a pair of pliers.
3. I then trimmed the flat head tip off the pin, and added my beads onto this end.
4. After adding all my beads onto a pin, I bent the other end into a loop, securing the beads.
5. Instead of closing the chain like a traditional necklace, instead line up your beads pins with each tail end of your chain.
6. Attach your beaded pins to the chain with jump rings using your pliers.
7. Create your bead fringes by adding beads onto flathead pins.
8. Attach your bead fringes to the end of your necklace with jump rings.
This is my first version. I want to create another with turquoise beads, longer pins, and a tapering fringe. (similar to my Darby Smart necklace)
Happy Crafting!
I love a good statement necklace. You can wear them layered with a scarf, or by themselves to spruce up an outfit. Check out the tutorial below to see how to make your own bohemian statement necklace:
2. I didn't have eye pins in my stash, so I instead made my own by bending the pin around the tip of a pair of pliers.
3. I then trimmed the flat head tip off the pin, and added my beads onto this end.
4. After adding all my beads onto a pin, I bent the other end into a loop, securing the beads.
5. Instead of closing the chain like a traditional necklace, instead line up your beads pins with each tail end of your chain.
6. Attach your beaded pins to the chain with jump rings using your pliers.
7. Create your bead fringes by adding beads onto flathead pins.
8. Attach your bead fringes to the end of your necklace with jump rings.
This is my first version. I want to create another with turquoise beads, longer pins, and a tapering fringe. (similar to my Darby Smart necklace)
Happy Crafting!
Repurposed Candle Jars
Hello World,
I'll admit it. I have a candle problem. Whenever Bath and Body Works has their large 3-wick candles on sale, I can't help but at least buy two. (And I stack the sale with a coupon, so the savings are even greater.) With that said, I have quite a collection of empty candle jars. I can't just throw them away, so here is a project to repurpose them into a glitter colorblock vase:
4. Cover your jar with your first layer of Mod Podge.
5. Pour glitter all that baby. Place a paper or mat on your work surface so you can later pour your leftover glitter back into its container.
6. Allow to set for a few minutes and repeat with a second layer of Mod Podge and glitter.
7. Allow to dry completely and remove your painter's tape.
After covering the candle jar with glitter, I got a little excited and started glittering other items. I bought these candle sticks at a thrift store and planned on using them for another tiered jewelry display, but instead spray painted and added glitter to them.
Happy Crafting!
I'll admit it. I have a candle problem. Whenever Bath and Body Works has their large 3-wick candles on sale, I can't help but at least buy two. (And I stack the sale with a coupon, so the savings are even greater.) With that said, I have quite a collection of empty candle jars. I can't just throw them away, so here is a project to repurpose them into a glitter colorblock vase:
1. Gather your supplies: a burnt out candle, glitter, Mod Podge, painter's tape, a paint or foam brush, rhinestones, and glue (not pictured).
2. Either melt the candle on a candle warmer or in a saucepan full of simmering water. You also could pop out the wax with a spoon. Pour the melted wax into an unwanted plastic/glass container.
3. Remove all labels and tape off part of your jar with painter's tape. Rub down any edges to avoid your Mod Podge bleeding through.
4. Cover your jar with your first layer of Mod Podge.
5. Pour glitter all that baby. Place a paper or mat on your work surface so you can later pour your leftover glitter back into its container.
6. Allow to set for a few minutes and repeat with a second layer of Mod Podge and glitter.
7. Allow to dry completely and remove your painter's tape.
8. If you have messy edges, just scratch off the imperfections with your fingernail. Super or hot glue rhinestones onto your jar.
Do you have a candle problem too? Check out this other tutorial to repurpose candle jars and this tutorial for using the leftover wax.
After covering the candle jar with glitter, I got a little excited and started glittering other items. I bought these candle sticks at a thrift store and planned on using them for another tiered jewelry display, but instead spray painted and added glitter to them.
Happy Crafting!
My Darby Smart Kit!
Hello World,
In some of my past posts, I blogged about the fun DIY kits (December to DIY For kit and the Cross Stitch Tote kit) that I bought from Darby Smart.
Well, I have very exciting news for you today! I am happy to announce that I have collaborated with Darby Smart to design this Suede Fringe Bib kit!
The kit is now available on their website for $17 (with free shipping), and includes the above supplies (and instructions) to make your own bold statement necklace. Check out more details here.
If you order a kit, I'd love to see how your take on this project! You can share your photos with the Darby Smart community by using #DarbySmart on Twitter or Instagram, and they'll add them to their Showroom.
Excited to see what you make! Happy Crafting!
In some of my past posts, I blogged about the fun DIY kits (December to DIY For kit and the Cross Stitch Tote kit) that I bought from Darby Smart.
Well, I have very exciting news for you today! I am happy to announce that I have collaborated with Darby Smart to design this Suede Fringe Bib kit!
![]() |
| Photo: Darby Smart |
![]() |
| Photo: Darby Smart |
If you order a kit, I'd love to see how your take on this project! You can share your photos with the Darby Smart community by using #DarbySmart on Twitter or Instagram, and they'll add them to their Showroom.
Excited to see what you make! Happy Crafting!
![]() |
| I am so excited to see my name on their website! It's like seeing my name in DIY-world lights! |
Labels:
accessories,
crafting,
Darby Smart,
DIY,
fringe,
gold,
necklace
DIY String Art
Hello World,
It seems that thrift shops have been raising their prices. I used to come home with a bag full of finds almost every time I went shopping, and now I tend to only buy one or two items. I was in luck last week though, when I found this wooden plaque for only $0.25!
I originally was going to hand paint a design on it, but decided to switch it up and make some string art instead. Check out the tutorial below to see how to make your own:
It seems that thrift shops have been raising their prices. I used to come home with a bag full of finds almost every time I went shopping, and now I tend to only buy one or two items. I was in luck last week though, when I found this wooden plaque for only $0.25!
I originally was going to hand paint a design on it, but decided to switch it up and make some string art instead. Check out the tutorial below to see how to make your own:
1. Gather your supplies: wood, metal nails, hammer, embroidery floss, a printed design, tape, paint, and a paintbrush.
2. I used Avenir ® Next Bold for my design and decreased the kerning around the 'O.' I printed it, trimmed my paper, and taped it down to my wood.
3. I hammered nailed into the corners of my letters first. Make sure you hammer your nails deep enough into your wood. I had a few of mine come loose, and I had to teach them a lesson.
4. After securing the corners of my letters, I eyeballed the spacing and added more nails to each letter.
5. Remove your paper at this point.
6. If you have any paper pieces leftover that are difficult to remove with your bare hands, use some tweezers to remove them.
7. I painted my wood and nails at this point because I wanted them the same color. If you don't care about your metal nails standing out, it would be better to paint your wood prior to hammering all your nails in place.
8. Tie a knot around a corner nail. Twist the tail end of your thread around the rest of your thread to secure it.
9. Outline each letter by working your thread around the outer edge of your nails.
10. Fill in each letter by randomly wrapping your thread around the nails, pulling tight the entire time. Tie a knot around a nail once you are satisfied, and trim your tail end.
11. Continue this process with the rest of your letters.
12. And tada, you have your own custom string art!
I love the shadows created by the strings on the wood!
Happy Crafting!
DIY Geometric Cutout Skirt
Hello World,
If you follow me on Instagram, you've probably noticed I have been on a triangle kick lately with my designs and projects. I recently bought a leopard maxi skirt at a thrift store for less than $4 and reconstructed it into a geometric, cutout mini skirt. Check out the tutorial below to see how to make your own:
Tip: For sharper corners on your cutouts, iron your edges down prior to sewing them.
Happy Crafting!
If you follow me on Instagram, you've probably noticed I have been on a triangle kick lately with my designs and projects. I recently bought a leopard maxi skirt at a thrift store for less than $4 and reconstructed it into a geometric, cutout mini skirt. Check out the tutorial below to see how to make your own:
DIY Valentine Decor
Hello World,
My latest Etsy Treasury and this video inspired the DIY project below.
When I began this project, I just started making paper roses, without a plan for what I was going to glue them on. I figured once I made a decent pile of them, it would dawn on me.
After making it through a few episodes of The Originals (I actually like it way more than Vampire Diaries), my coffee table was covered with paper roses and scraps. Fast forward a few days, and those paper roses were still piled on my coffee table, waiting to be utilized.
I wanted to glue them to something inexpensive, so I went thrift shopping and to a dollar store (where I picked up a shelf liner). I originally was going to glue the roses to the shelf liner, but just ended up making more roses with it. I just love the textured roses!
Fast forward a few more days and it dawns on me. I have a pizza box in my recycling bin. I could glue all these roses to it instead of a canvas. Thankfully one of my New Year's resolutions wasn't to avoid carbohydrates. Check out the inexpensive tutorial below:
1. Gather your supplies: paper or various materials (lace, burlap, a shelf liner, etc), a hot glue gun, glue sticks, scissors, a base to glue the roses to (hello pizza box!), and spray paint.
2. Make all your roses by cutting out paper swirls and twirling them into a rose shape. Check out this video tutorial for a better explanation.
3. I spray painted the lid to my pizza box white. This way if there were gaps between my roses, the brown cardboard wouldn't be visible.
4. Trim your cardboard, draw out your design, and start hot glueing your roses down.
5. Continue glueing until the cardboard is completely covered.
6. Tada! You have some super inexpensive Valentine decor!
I think I'll make another version of this, and glue burlap roses to some old barn wood. Maybe I'll make a giant cursive monogram.
Happy Crafting!
My latest Etsy Treasury and this video inspired the DIY project below.
When I began this project, I just started making paper roses, without a plan for what I was going to glue them on. I figured once I made a decent pile of them, it would dawn on me.
After making it through a few episodes of The Originals (I actually like it way more than Vampire Diaries), my coffee table was covered with paper roses and scraps. Fast forward a few days, and those paper roses were still piled on my coffee table, waiting to be utilized.
I wanted to glue them to something inexpensive, so I went thrift shopping and to a dollar store (where I picked up a shelf liner). I originally was going to glue the roses to the shelf liner, but just ended up making more roses with it. I just love the textured roses!
Fast forward a few more days and it dawns on me. I have a pizza box in my recycling bin. I could glue all these roses to it instead of a canvas. Thankfully one of my New Year's resolutions wasn't to avoid carbohydrates. Check out the inexpensive tutorial below:
1. Gather your supplies: paper or various materials (lace, burlap, a shelf liner, etc), a hot glue gun, glue sticks, scissors, a base to glue the roses to (hello pizza box!), and spray paint.
2. Make all your roses by cutting out paper swirls and twirling them into a rose shape. Check out this video tutorial for a better explanation.
3. I spray painted the lid to my pizza box white. This way if there were gaps between my roses, the brown cardboard wouldn't be visible.
4. Trim your cardboard, draw out your design, and start hot glueing your roses down.
5. Continue glueing until the cardboard is completely covered.
6. Tada! You have some super inexpensive Valentine decor!
I think I'll make another version of this, and glue burlap roses to some old barn wood. Maybe I'll make a giant cursive monogram.
Happy Crafting!
Shabby Chic Chandelier/Wind Chime
Hello World,
One of my friends gave me a bunch of keys for my birthday last year and a few more for Christmas this year, and I finally got around to using them to make some home decor.
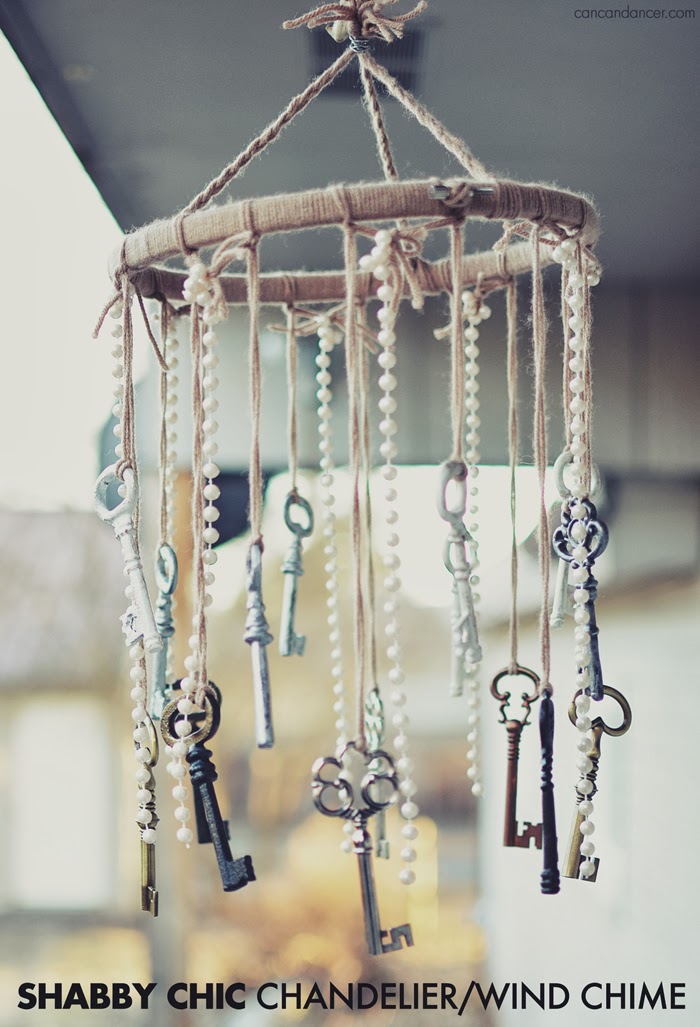
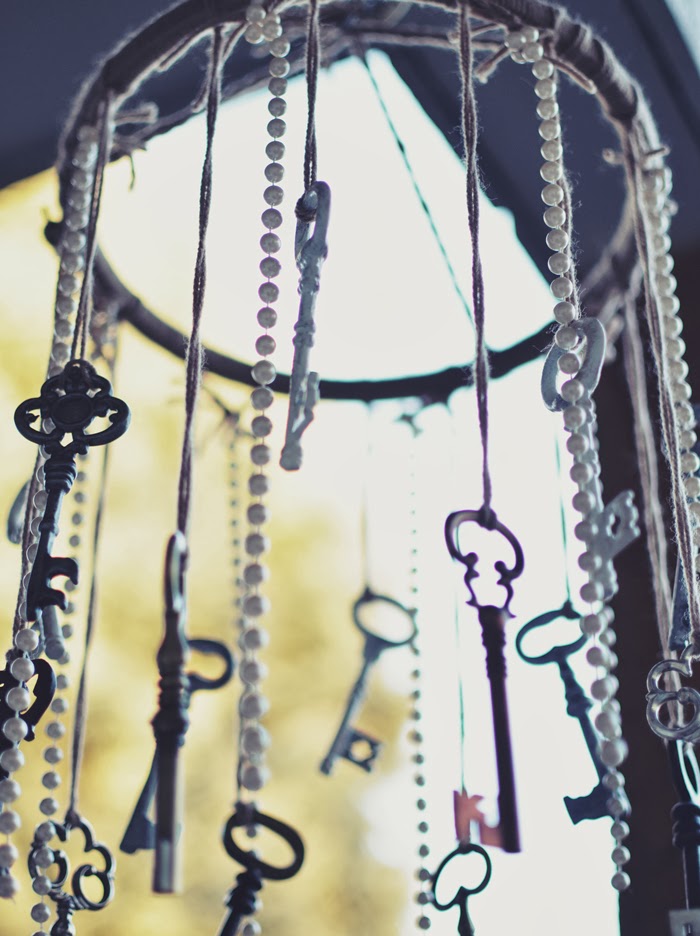
I made a shabby chic chandelier/wind chime with the keys (she got them from Michael's) and some pearl garland I picked up at a yard sale for $0.50. Below is just the first stage of it. I probably will add more beads, tiers, and lace trim to it as I come across them while thrift shopping.
Check out the tutorial below to see how to make your own:
1. Gather your supplies: large keys, beads or pearl garland, scissors, yarn, an embroidery hoop, pliers, and wire.
2. Star off by knotting the tail end of your yarn to your embroidery hoop.
3. Wrap the yarn around the embroidery hoop, covering the tail end as you work your way around the hoop.
4. Continue wrapping yarn around your hoop until it is completely covered.
5. Loop some yarn through your first key, and pull the tail ends through the loop you created, catching the key in the loop. Tie this first key strand to your embroidery hoop.
6. Continue with more keys, equally spacing them out. I used the silver/white keys for the shorter tier of my chandelier.
7. Continue adding keys to your hoop until you are satisfied. I did alternating lengths for my keys.
8. With the tail ends of each of the key strands, I tied them to their nearest neighbor. I tied my pearl strands to these yarn loops. Trim the tail ends if you wish, but I left mine long in case I decide to add more beads in the future.
9. Cut out 9 pieces of yarn that are all the same length. Place them in groups of three, fold them in half and loop them around the embroidery hoop.
10. Braid each of these yarn groups and knot the ends. (If you want a more secure chandelier, you can use the wire as your hanging mechanism instead of yarn.)
11. Bring your three braids ends together and secure them by wrapping wire around them.
12. I created a small wire loop and attached this to my wire wrapping to be used as a hanging point. Add more materials to your chandelier if you want it more complex, hang, and enjoy!
Happy Crafting!
Embroidered Tote (Made with a Darby Smart kit)
Hello World,
Earlier this month I received my first Darby Smart kit and made this cute DIY marquee sign. Well, I bought another kit, and after watching a few episodes of Vampire Diaries, I finished it!
I bought the Cross-Stitch Tote kit (designed by Ana of We Love Citrus) which included a Baggu duck bag! I really like Baggu bags, they have minimal metal accents and are so sturdy! I personalized my tote with both embroidery and fabric paint. I decided on an abstract triangle-centric design, as I have been on a geometric kick lately.
Earlier this month I received my first Darby Smart kit and made this cute DIY marquee sign. Well, I bought another kit, and after watching a few episodes of Vampire Diaries, I finished it!
I bought the Cross-Stitch Tote kit (designed by Ana of We Love Citrus) which included a Baggu duck bag! I really like Baggu bags, they have minimal metal accents and are so sturdy! I personalized my tote with both embroidery and fabric paint. I decided on an abstract triangle-centric design, as I have been on a geometric kick lately.
Check out more Darby Smart kits here, and sign up for their emails if you love coupons like I do!
PS Do you watch Vampire Diaries? Are you Team Damon or Stefan? I just started season 4 on Netflix and am back on team Stefan. He is so gorgeous. THAT.HAIR
PSS I was not paid to write about Darby Smart. I just love all things DIY.
DIY Slipper Socks
Hello World,
Need a last minute gift idea? Or just want to make a little something for yourself? I made my own slipper socks with scrap fabric and a thrifted sweatshirt, making this a very inexpensive DIY project.
Check out the tutorial below:
Need a last minute gift idea? Or just want to make a little something for yourself? I made my own slipper socks with scrap fabric and a thrifted sweatshirt, making this a very inexpensive DIY project.
Check out the tutorial below:
1. Gather your materials: decorative fabric for the top of the slipper, a thicker fabric (to make these extra cozy! I used a thrifted sweatshirt), pins, scissors, a sewing machine (or needle and thread).
2. Make your own pattern by tracing your foot, or use the pattern pieces I used. Download them here.
3. Fold your decorative fabric in half, wrong sides together. I used a stretch knit, so I didn't worry about the grain. Place the first pattern piece (the one that looks like a 90's telephone- see the slight resemblance?) down along the fold. Pin and cut.
4. If you add a half inch of seam allowance around all the pattern pieces, you will roughly end up with a size XL Women's slipper sock. If you don't include seam allowance, roughly a size L. For those with smaller feet, just trim the pattern pieces accordingly to fit your foot size.
5. Place the first pattern piece on your thicker fabric along the fold. (I used the sleeve of my sweatshirt.) Pin and cut.
6. Place your second pattern piece (the one that slightly resembles a foot) down on your thicker fabric. Pin and cut through two layers of fabric at the same time. The reason for this is because you will notice the second pattern piece is asymmetrical. This is to accommodate the big toe. Cutting through both layers at the same time helped it so I didn't end up with two left feet.
7. Repeat steps 3-6 for the cutting out the other slipper sock. When cutting out your second pattern piece this time around though, place the pattern piece right side down on your fabric (so you end up with both feet). You will end up with four pieces per slipper sock, these will make the liner and the shell.
8. Fold your top pieces in half, right sides together. Pin the heel areas closed and sew.
9. This will leave you with asymmetrical loops of fabric.
10. Place your liner fabrics right side together on top of each other.
11. Pin around the entire edge of your pattern pieces.
12. When you get to the heel area, you will have excess fabric. Pinch and pin the heel area down to the second pattern piece.
13. At this point your work will start to resemble a slipper sock!
14. Sew around the entire circumference of your slipper sock.
15. Repeat pinning process with the shell fabric pieces.
16. Place your liner piece inside your shell piece, right sides together.
17. Sew them together, along the ankle area. Leave a small gap near the back seam.
18. Turn your slipper sock right side out via the hole you left.
19. Push your liner into your shell, and sew the hole closed.
20. Repeat with the other slipper sock.
Tada! You have some custom-made slipper socks! If you are worried about slipping while wearing them, just take puffy paint and add some dots to the sole of your slipper socks. (My mom used to do this on my socks when I was little.)
Happy Crafting!
The PAINT Box
Hello World,
A few years ago, I found this cassette tape case at a consignment shop. I tore this baby apart and completely covered the inside with my favorite Tumblr images and magazine clippings. I have since stored all of my craft paints and printmaking inks inside it.
Compared to the chaotic inside, the outside was just a little too plain. I just used chalk to outline the design, painted a few coats of acrylic paint, and then used a sharpie to outline the design. A simple DIY to add some pizazz to an old school looking case.
PS- Do you think I painted the word 'paint' to literally label the box as containing paint, or as a verb?
Answer - A little bit of both. Happy Crafting!
A few years ago, I found this cassette tape case at a consignment shop. I tore this baby apart and completely covered the inside with my favorite Tumblr images and magazine clippings. I have since stored all of my craft paints and printmaking inks inside it.
Compared to the chaotic inside, the outside was just a little too plain. I just used chalk to outline the design, painted a few coats of acrylic paint, and then used a sharpie to outline the design. A simple DIY to add some pizazz to an old school looking case.
PS- Do you think I painted the word 'paint' to literally label the box as containing paint, or as a verb?
Answer - A little bit of both. Happy Crafting!
Darby Smart (December TO DIY FOR Kit)
Hello World,
Have you ever heard of Darby Smart? They partner with designers to launch DIY kits based on current trends. Their kits come with materials and instructions, to help crafters avoid all those Pinterest fails. They have subscriptions for their kits, or you can just buy them individually.
I recently purchased my first kit from them, the December TO DIY FOR kit. I picked this kit because the contents were a mystery, and I do love a good surprise. So if you were planning to order this kit, sorry for the spoilers below!
How cool is this DIY kit? I was really excited to make the marquee sign, as that was a craft that never crossed my mind before. In the kit they give you two pieces of foam core (so you have one to practice on). I instead cut my extra foam core into three long horizontal strips, and then cut one of the long strips in half. This gave me four strips of foam core that were about the same lengths as the four sides of my sign.
I hot glued these to the back of my sign, creating a backwards shadow box. This helped to create a sturdy frame, so that the sign can stand on its own. Check out the kit here for more info.
This kit actually has inspired me to possibly make more marquee signs. Maybe I'll make a bigger one with an entire quote.
PS I was not paid to write about Darby Smart. I just think their kits a cool idea. Birchbox sends you beauty items, and Darby Smart sends you DIY kits. And I love all things DIY. :)
PSS If you sign up for their emails, they let you know the moment new kits launch (some of them go pretty fast), as well as coupon codes!
Happy Crafting!
Have you ever heard of Darby Smart? They partner with designers to launch DIY kits based on current trends. Their kits come with materials and instructions, to help crafters avoid all those Pinterest fails. They have subscriptions for their kits, or you can just buy them individually.
I recently purchased my first kit from them, the December TO DIY FOR kit. I picked this kit because the contents were a mystery, and I do love a good surprise. So if you were planning to order this kit, sorry for the spoilers below!
I absolutely love their packaging.
How cool is this DIY kit? I was really excited to make the marquee sign, as that was a craft that never crossed my mind before. In the kit they give you two pieces of foam core (so you have one to practice on). I instead cut my extra foam core into three long horizontal strips, and then cut one of the long strips in half. This gave me four strips of foam core that were about the same lengths as the four sides of my sign.
I hot glued these to the back of my sign, creating a backwards shadow box. This helped to create a sturdy frame, so that the sign can stand on its own. Check out the kit here for more info.
This kit actually has inspired me to possibly make more marquee signs. Maybe I'll make a bigger one with an entire quote.
PS I was not paid to write about Darby Smart. I just think their kits a cool idea. Birchbox sends you beauty items, and Darby Smart sends you DIY kits. And I love all things DIY. :)
PSS If you sign up for their emails, they let you know the moment new kits launch (some of them go pretty fast), as well as coupon codes!
Happy Crafting!
Subscribe to:
Posts (Atom)