Hello World! Can Can Dancer has moved. Please visit www.cancandancer.com to see new DIY posts (and all past posts too!). Happy Crafting!
Showing posts with label craft. Show all posts

Repurposed Candle Jars

Hello World,

I'll admit it. I have a candle problem. Whenever Bath and Body Works has their large 3-wick candles on sale, I can't help but at least buy two. (And I stack the sale with a coupon, so the savings are even greater.) With that said, I have quite a collection of empty candle jars. I can't just throw them away, so here is a project to repurpose them into a glitter colorblock vase:


1. Gather your supplies: a burnt out candle, glitter, Mod Podge, painter's tape, a paint or foam brush, rhinestones, and glue (not pictured).

2. Either melt the candle on a candle warmer or in a saucepan full of simmering water. You also could pop out the wax with a spoon. Pour the melted wax into an unwanted plastic/glass container.

3. Remove all labels and tape off part of your jar with painter's tape. Rub down any edges to avoid your Mod Podge bleeding through.

4. Cover your jar with your first layer of Mod Podge.

5. Pour glitter all that baby. Place a paper or mat on your work surface so you can later pour your leftover glitter back into its container.

6. Allow to set for a few minutes and repeat with a second layer of Mod Podge and glitter.

7. Allow to dry completely and remove your painter's tape.

8. If you have messy edges, just scratch off the imperfections with your fingernail. Super or hot glue rhinestones onto your jar.

9. Fill your sparkly vase with fake/fresh flowers, twigs, pens, makeup brushes, etc.

Do you have a candle problem too? Check out this other tutorial to repurpose candle jars and this tutorial for using the leftover wax.


After covering the candle jar with glitter, I got a little excited and started glittering other items. I bought these candle sticks at a thrift store and planned on using them for another tiered jewelry display, but instead spray painted and added glitter to them.

Happy Crafting!


Embroidered Tote (Made with a Darby Smart kit)

Hello World,

Earlier this month I received my first Darby Smart kit and made this cute DIY marquee sign. Well, I bought another kit, and after watching a few episodes of Vampire Diaries, I finished it!

I bought the Cross-Stitch Tote kit (designed by Ana of We Love Citrus) which included a Baggu duck bag! I really like Baggu bags, they have minimal metal accents and are so sturdy! I personalized my tote with both embroidery and fabric paint. I decided on an abstract triangle-centric design, as I have been on a geometric kick lately.


Check out more Darby Smart kits here, and sign up for their emails if you love coupons like I do!

PS Do you watch Vampire Diaries? Are you Team Damon or Stefan? I just started season 4 on Netflix and am back on team Stefan. He is so gorgeous. THAT.HAIR

PSS I was not paid to write about Darby Smart. I just love all things DIY.

The PAINT Box

Hello World,

A few years ago, I found this cassette tape case at a consignment shop. I tore this baby apart and completely covered the inside with my favorite Tumblr images and magazine clippings. I have since stored all of my craft paints and printmaking inks inside it.

Compared to the chaotic inside, the outside was just a little too plain. I just used chalk to outline the design, painted a few coats of acrylic paint, and then used a sharpie to outline the design. A simple DIY to add some pizazz to an old school looking case.


PS- Do you think I painted the word 'paint' to literally label the box as containing paint, or as a verb?

Answer - A little bit of both. Happy Crafting!

Darby Smart (December TO DIY FOR Kit)

Hello World,

Have you ever heard of Darby Smart? They partner with designers to launch DIY kits based on current trends. Their kits come with materials and instructions, to help crafters avoid all those Pinterest fails. They have subscriptions for their kits, or you can just buy them individually.

I recently purchased my first kit from them, the December TO DIY FOR kit. I picked this kit because the contents were a mystery, and I do love a good surprise. So if you were planning to order this kit, sorry for the spoilers below!

I absolutely love their packaging.


How cool is this DIY kit? I was really excited to make the marquee sign, as that was a craft that never crossed my mind before. In the kit they give you two pieces of foam core (so you have one to practice on). I instead cut my extra foam core into three long horizontal strips, and then cut one of the long strips in half. This gave me four strips of foam core that were about the same lengths as the four sides of my sign.

I hot glued these to the back of my sign, creating a backwards shadow box. This helped to create a sturdy frame, so that the sign can stand on its own. Check out the kit here for more info.

This kit actually has inspired me to possibly make more marquee signs. Maybe I'll make a bigger one with an entire quote.

PS I was not paid to write about Darby Smart. I just think their kits a cool idea. Birchbox sends you beauty items, and Darby Smart sends you DIY kits. And I love all things DIY. :)

PSS If you sign up for their emails, they let you know the moment new kits launch (some of them go pretty fast), as well as coupon codes!

Happy Crafting!

Planet Inspired Ornaments

Hello World,

As you might have noticed from my last post, I have a slight obsession with anything extraterrestrial. The tutorial below shows the process I used to make some planet inspired ornaments. All you need is: glass-friendly paint, glass ornaments, and cheap paint brushes.


Extra Tips: Be sure to cover your workspace. I didn't, got paint on my craft table, and then had to give my table a nice scrubbing. When after you are done painting your ornaments, allow them to dry with the lids off (so the paint dries faster).

Happy Crafting!

Music: "Enthusiast" by Tours (CC by 3.0) http://bit.ly/1at7bCw

*FTC- This is not a sponsored video. All opinions are my own. I only mention Michael's because I do like a good deal.

DIY Lined Zipper Pouch + Freebie Friday

Hello World,

Today I have both a tutorial and a giveaway for you! Check out the tutorial below to learn how to make your own customizable zippered pouch, and enter the giveaway to win the one featured in this tutorial:


1. Gather your supplies: fabric, a zipper, scissors, acrylic or fabric paint, a foam or paintbrush, freezer paper, an iron and ironing board, and a sewing machine or needle and thread.

2. Cut out 4 rectangles of fabric that are the same length as your zipper.

3. Fold the top edge of each rectangle over 1/4" inch and iron flat.

4. Cut a strip of freezer paper. This will be used to make your stencil.

5. Cut your designs out of your freezer paper. If you draw on your freezer paper, draw on the matte side of the paper, not the shiny side.

6. Iron your freezer paper onto your fabric, shiny side down.

7. Paint gently within each freezer paper stencil. Be careful around your edges, so paint doesn't leak out of your stencil.

8. Allow to dry and gently remove your contact paper. Iron both sides of your design to set the paint.

9. Sandwich one edge of your zipper (right side up) in between two rectangles of fabric (wrong sides together).

10. Sew through all three layers (fabric shell, zipper, fabric liner).

11. Repeat steps 9 and 10 for the other half of your pouch.

12. Now that everything is sewed to your zipper, unzip your zipper. Fold your shell on top of your other shell fabric piece. This places your two shell pieces on top of each other, right sides together, and does the same with your liner pieces.

13. Sew around the edges of your entire rectangle, leaving a gap on the liner edge.

14. Turn your bag right side out via the gap in the liner.

15. Sew this gap closed, and push your liner into the body of your pouch.

16. Tada! You have made your own lined zipper pouch!

I used the same fabric for the liner and the shell of this pouch, but using coordinating fabric would work great too. Use this type of pouch as a makeup bag, pencil case, mini iPad case, etc.

PS- Remember the giveaway I mentioned? Well, enter below and one winner will receive this chevron pouch, handmade by yours truly. Giveaway ends next Friday, November 22nd.

Happy Crafting!


a Rafflecopter giveaway

Braided One Shoulder Tunic

Hello World,

I reconstructed a sweater similar to this a few years ago, but I never made a tutorial for it. Check out the tutorial below to see how to turn an over-sized shirt into a one-shoulder tunic or dress:


1. Gather your supplies: an long-sleeved over-sized shirt, elastic, scissors or rotary cutter and board, pins, a safety pin, and a sewing machine. (You could hand sew this project, it would just take longer.)

2. Lay your shirt flat. Cut off the sleeves and neckline.

3. Take one sleeve, and cut off the side seam.

4. Lay the sleeve out flat.

5. Cut 3 long strips from that sleeve. Mine were each 2.5" x 18."

6. Fold each of those strips in half lengthwise and sew, right sides together.

7. Sew the other two strips this way.

8. Place a safety pin at the end of your first strip, and feed it back through the tube you made. This will turn the tube right side out. Repeat will the other two strips.

9. (I don't have pictures of this step, but take the large portion of your original shirt and sew up the side seams (right sides together) and hem the top of it. This will create a baggy tube top.)

10. If your tube top is super baggy, sew elastic to the back top hem. Stretch the elastic as you sew so that it gathers evenly.

11. Try on your baggy tube top, and mark with pins where you want each of your braid strips to hit. Also note where you would like the strap to connect on the back. I used my bra strap as a guild and just marked a pin there.

12. Remove the tunic, and pin your three strips where your front pins were located.

13. Sew your strips to your top hem. Make sure your seams end up inside the dress of the tunic.

14. Braid your strips and then pin and sew the other ends to the back of your tunic.

Add a belt if your tunic is a little too baggy, and enjoy.

Happy crafting!


Autumn Leaves Garland

Hello World,

I have two large maple trees in my yard, and they shed a decent amount of leaves every year. This year instead of making fall decor with paper leaves, I made garland with real leaves. The garland will eventually completely die, but while it is still alive, it will transform in appearance with the different stages of fall.

Check out the simple tutorial below:


1. Gather your leaves. Pick freshly fallen leaves so your garland will have a slightly longer life.

2. Check for bugs and allow your leaves to dry if they are wet.

3. Sew through your leaves with a long straight stitch, allowing an inch or two between each leaf of threading. I sewed my leaves at random angles so they would resemble the actual act of falling.

4. Tie knots at the ends of your garland to secure the end leaves.

5. Hang and enjoy it as it changes in appearance.

Happy Crafting!
DIY Jewelry Display

Hello World,

Have you seen those darling jewelry stands made with vintage plates at consignment shops or craft fairs, but not wanted to fork over $25-$40 for one? Well, I went thrifting, and found 3 plates and 2 candle sticks for less than $4!


Check out the tutorial below, to make one of your own:


1. Gather your supplies: vintage plates, candle sticks, E6000 or caulk, and spray paint if you don't like the color of your candle sticks. (Maybe, I bought more plates than I needed, but some of them were only $0.35 each!)

2. Remove any stickers, wash and then dry your candle sticks and plates. Spray paint your candle sticks if you wish, I'm on a gold kick lately.

3. Decide on which plates to use. I used 3 different sizes so my display, with the smallest plate on top.

4. Apply a nice amount of E6000 or caulk to the bottom of your candle stick, and place that baby down on the top of your first plate.

5. Apply E6000 or caulk to the top of that candle stick, and then place your next plate on top of it.

6. Repeat for the last candle stick and plate.

7. Allow to dry overnight and then enjoy!

Happy Crafting!
Wine Cork Magnets

Hello World,

I like to collect wine corks. I love the texture, the unique designs, and how great they are as a craft material. I really want to make a cork board someday, but collecting them authentically is taking me what feels like forever. So, if you are like me and want a project that can be done with limited wine corks, here is a project for you:


Wine cork magnets. Simple right? Check out the tutorial below:

1. Gather your supplies: wine corks, an adhesive magnet sheet, and a box cutter / exacto knife.

2. Carefully, cut your wine cork in half lengthwise.

3. Cut your magnetic sheet to the same size as your wine cork.

4. Peel off the paper backing and stick the magnetic to your wine cork.

That's it. Wam bam, you have some unique magnets! 

If you want to be really thrifty, repurpose magnets (say the ones you get from Dominos or your dentist) and just glue them to the back of your corks. These could be a cute gift for a birthday, bachelorette party, anniversary (especially if the cork held significance).

Happy Crafting!

Glitter & Stud Your Phone Case

Hello World,

I have a Google Nexus, and finding cases for it can sometimes be a challenge. I decided to spruce up my plain case with two of my favorite things- glitter and studs. Check out the tutorial below for this super simple DIY project:


1. Gather your materials: a phone case, Mod Podge, glitter, clear spray paint, a paint or foam brush, flat-back studs, and E-6000.

2.  Place your phone case on top of a paper plate. I used a paper plate so that I could funnel my leftover glitter back into the container.

3.  Apply your first layer of Mod Podge.

4.  Cover that baby with glitter.

5.  Allow to dry, then add another layer of Mod Podge.

6.  Add more glitter. I used black glitter on a black case so if I missed spots it wouldn't be as noticeable.

7.  Allow to dry. Spray with clear spray paint to waterproof it.

8.  Glue on your studs (in a ventilated area). Mine were from a clearance bin at Michael's and were meant to be ironed on... but they were only $0.50.

9.  Allow everything to dry overnight. In the last picture above, everything was still a little tacky because I was impatient.

Tada! You have a personalized case! Other DIY case ideas could be to use: images, scrapbook paper, rhinestones, etc. Once I find another cheap case for my phone, I really want to make one completely covered with pyramid studs.

Happy Crafting!


Clay + Twine Bracelets

Hello World,

Have you ever worked with Super Sculpey? A professor back in college introduced me to it because unlike regular oven-bake clay, it cooks into a ceramic-like material (that is pretty much shatter-proof). It actually feels more like plastic once cooked, and it slightly bendable.

I had decent amount leftover from art projects, and decided to whip up some bracelets with my own custom charms.


Check out below for how to make some yourself. Warning: this tutorial is longer than usual. :)


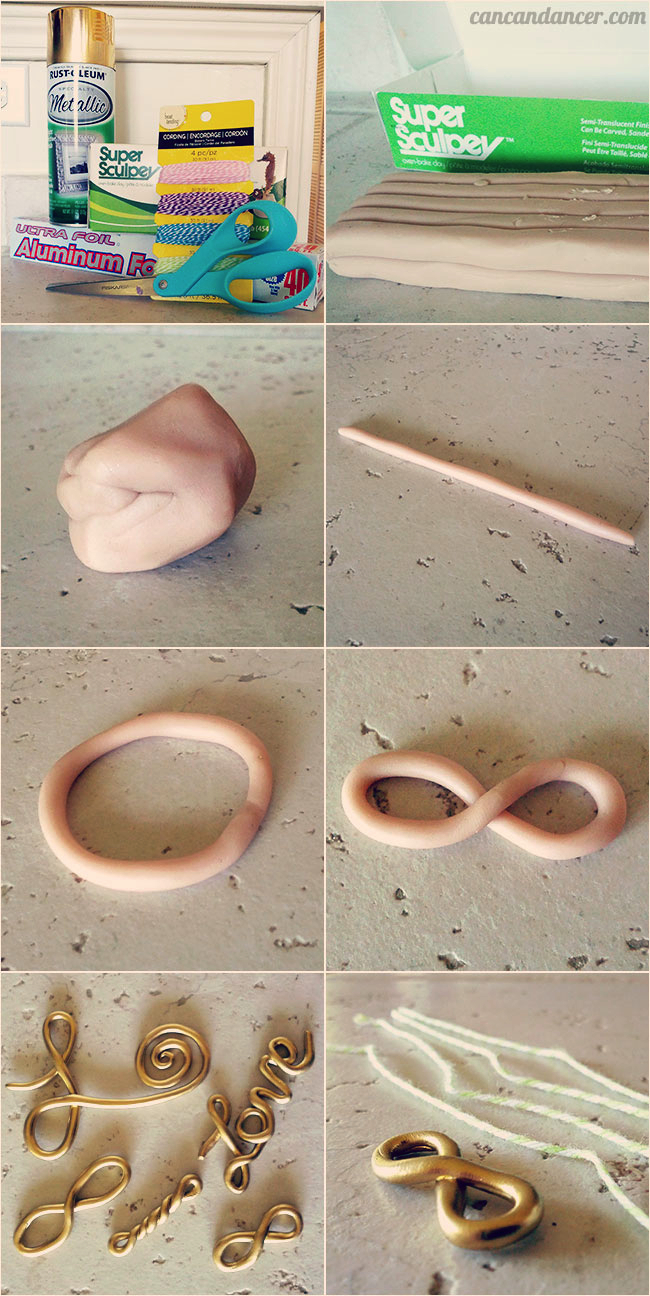
1. Gather your supplies: oven-bake clay (and a standard kitchen oven), aluminum foil to cook it on,  twine (mine is baker's twine), scissors, spray paint, and beads along with a short piece of jewelry wire (not pictured).

2. Break off a quarter-sized amount of clay.

3. Play with the clay until it is more pliable. 

4. Roll your clay into a nice, even log.

5. Connect the two ends of your log together, and then roll the connected area between your fingers until the seam blends away.

6. Holding your loop, twist it until you form an infinity symbol.

7.  Bake your clay according to your box directions, allow to cool, and then paint.

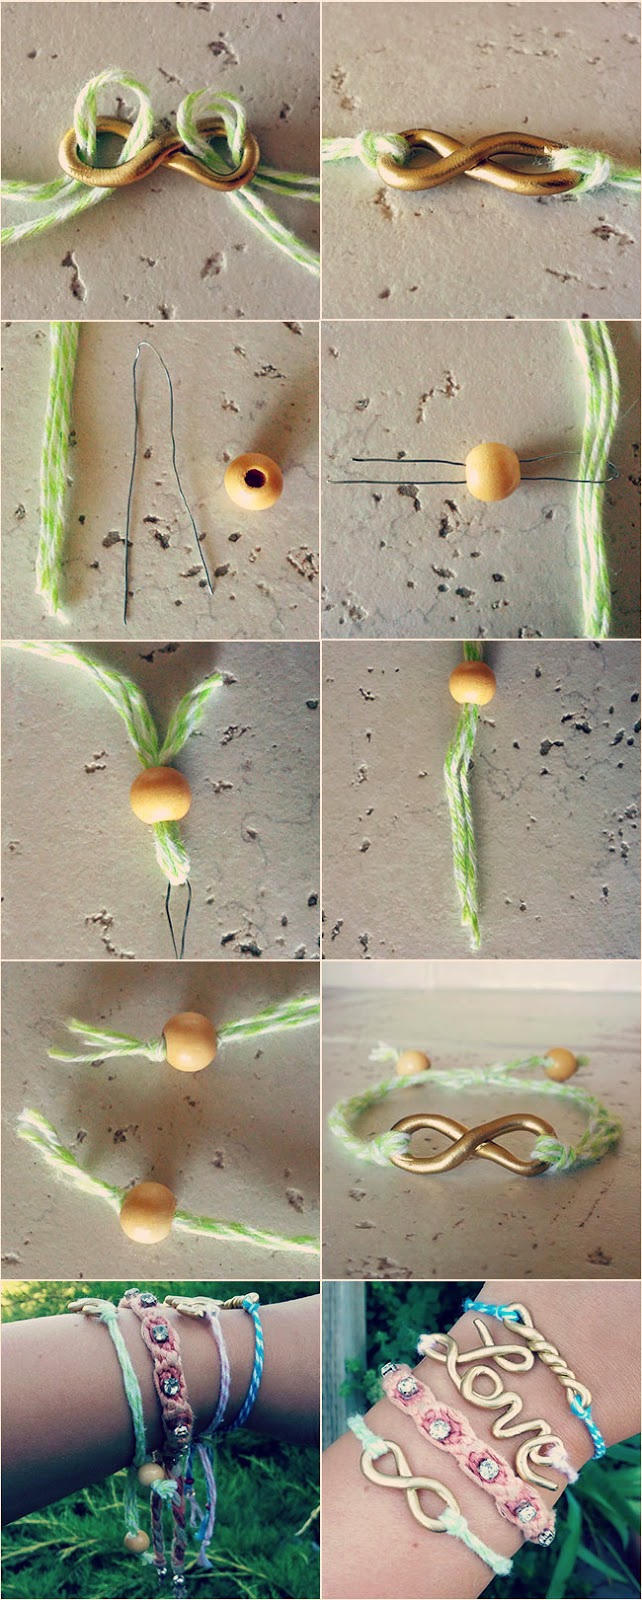
8.  Cut out 2-4 pieces of twine, all the same length. If you are unsure of the length, cut each piece equal to the circumference of your wrist. If it ends up being too long, you can always trim it later.

9.  For this bracelet, I used four pieces of twine. I paired two for each side. Fold them in half and feed the looped end through your infinity charm.

10.  Pull the corresponding tail ends through the thread loops, trapping the infinity charm.

11.  Now, if your twine is too difficult to feed through a bead, use this trick: get your jewelry wire, and fold it gently in half.

12.  Loop the wire around a tail end of your twine, and feed the bead onto the wire.

13.  Pull the wire through the bead.

14.  Pull until the tail end of your twine is through the bead.

15.  Tie double knots at the end of each twine to secure your beads.

16.  To wear your new bracelet, either tie a simple knot around your wrist, or do a sliding knot. I used this tutorial to do my knots: YouTube.


Experiment with different shapes, colors, ect, and enjoy your new arm candy!

Happy Crafting!

Make your own Seashell Garland

Hello World,

I have been on an ocean kick lately: from accessories, to the bottles of wine I buy, to home decor. I have found it difficult to find beach-inspired home decor though that isn't too 'loud.'

With that being said, I decided to make some simple seashell garland. I currently don't have any power tools, so I used a wrapping method to make my garland (instead of drilling holes into each shell.)


Check out below for the instructions:


1.  Gather your supplies: seashells (I found a nice, big bag at a thrift shop for $2), twine (mine is hemp) and scissors.

2.  Pick your first sea shell. I picked ones for this project that had a nice 'bulge' on the top. (So my twine wouldn't slide off.)

3.  Lay your seashell on top of your twine, with your tail end above it. (I didn't cut my twine until I was done with my garland.)

4.  Wrap your twine around your shell, and loop it around the back, making an upside down 'V' in the back.

5.  Continue wrapping your twine around the front, making an uneven 'X.'

6.  With both ends of your twine at the top, pull it tightly around the shell. Tie a knot, trapping the back 'V' in the knot.

7.  If your twine ends are aiming in wonky directions, simply feed the twine under your knot to force it to lay more flat.

8. Continue with the rest of your shells. I left 3-4 inches of twine between each shell.

Happy Crafting!

Twine-wrapped Photo Display

Hello World!

With my new internship, I have my own work area. It was looking rather bland (with just standard office supplies), so I decided to make my own photo display.

I made a symmetrical-style display in the past, but it was tough to get all the ribbon angles exactly the same. This time around, I decided to make one that didn't need to be perfect and was more sporadic in the wrapping. I chose neutral fabric and twine so my desk doesn't scream GIRL.


Check out below for the instructions:


1.  Gather your supplies: foam core, fabric, twine, scissors, and hot glue with sticks.

2.  Place your fabric (right side down) on your workspace, and place your foam core on top of it.

3.  Begin by placing a string of hot glue on your foam core. 

4.  Wrap your fabric around your foam core and stick to the hot glue. (If you are worried about burning yourself, push the fabric into the glue with a pencil or chopstick.) Continue glueing and pressing your fabric until it is completely adhered. 

5.  Place a pile of hot glue on the back side of your foam core, and place the tail end of your twine into it.

6.  Sandwich your twine and hot glue with a piece of scrap fabric. (This will help to better secure it, once the glue dries.)

7.  Begin wrapping your twine tightly around your foam core. Go in random directions, or form a pattern if you wish. 

8.  Once you feel you have enough twine wrapped, repeat step 5 with the other tail end.

9. Allow everything to completely cool. Glue fabric to the back if you want to hide the sloppy backside.

10. Slide photos, cards, ect between your strings, and enjoy!


Happy crafting!